A step-by-step, beginner-friendly guide to every screen, button and feature — from your first login to winning bids and running fully compliant projects.
rbcopilot.com · Edition 1.0 · May 2026 · Confidential
Start Here
How to use this manual
This guide assumes you have never seen RBCopilot before. Every feature is explained in plain English: what it is, a real screenshot, and numbered steps to use it. You do not need to read it cover to cover — jump to the chapter you need from the Table of Contents.
The colored boxes you will see
✅TIP — a shortcut or best practice that saves you time.
⭐PRO MOVE — a power-user trick that gets more out of the platform.
ℹ️GOOD TO KNOW — background that helps things make sense.
⚠️WATCH OUT — something that can cost you money or time if you skip it.
The two halves of RBCopilot Pro
RBCopilot Pro has a switch in the sidebar that flips the whole app between two jobs:
BID PIPELINE → win the right workCOMPLIANCE COPILOT → build it, get paid, stay compliant
Everything is multi-tenant and private: your company is its own locked workspace with its own users and roles. Nobody outside your company can see your data.
Contents
What's inside
0First StepsLogin · the workspace · Company Profile · projects
1The Daily Command CenterControl Center · Dashboard · Action Center
2Getting Ready to BuildPre-Con · Readiness · Closeout
3The Role Modes10 job-specific cockpits
4The AI SpecialistsDivision agents · Specifications
9Connecting the Field AppDispatch jobs · receive field reports
00
Chapter 0
First Steps
Get into the platform, learn the layout, and set up your company so every form fills itself in.
In this chapter
Signing in
The workspace layout (sidebar & topbar)
Company Profile
Creating & opening projects
0.1 · Sign in
Signing in to RBCopilot Pro
rbcopilot.com → Sign in
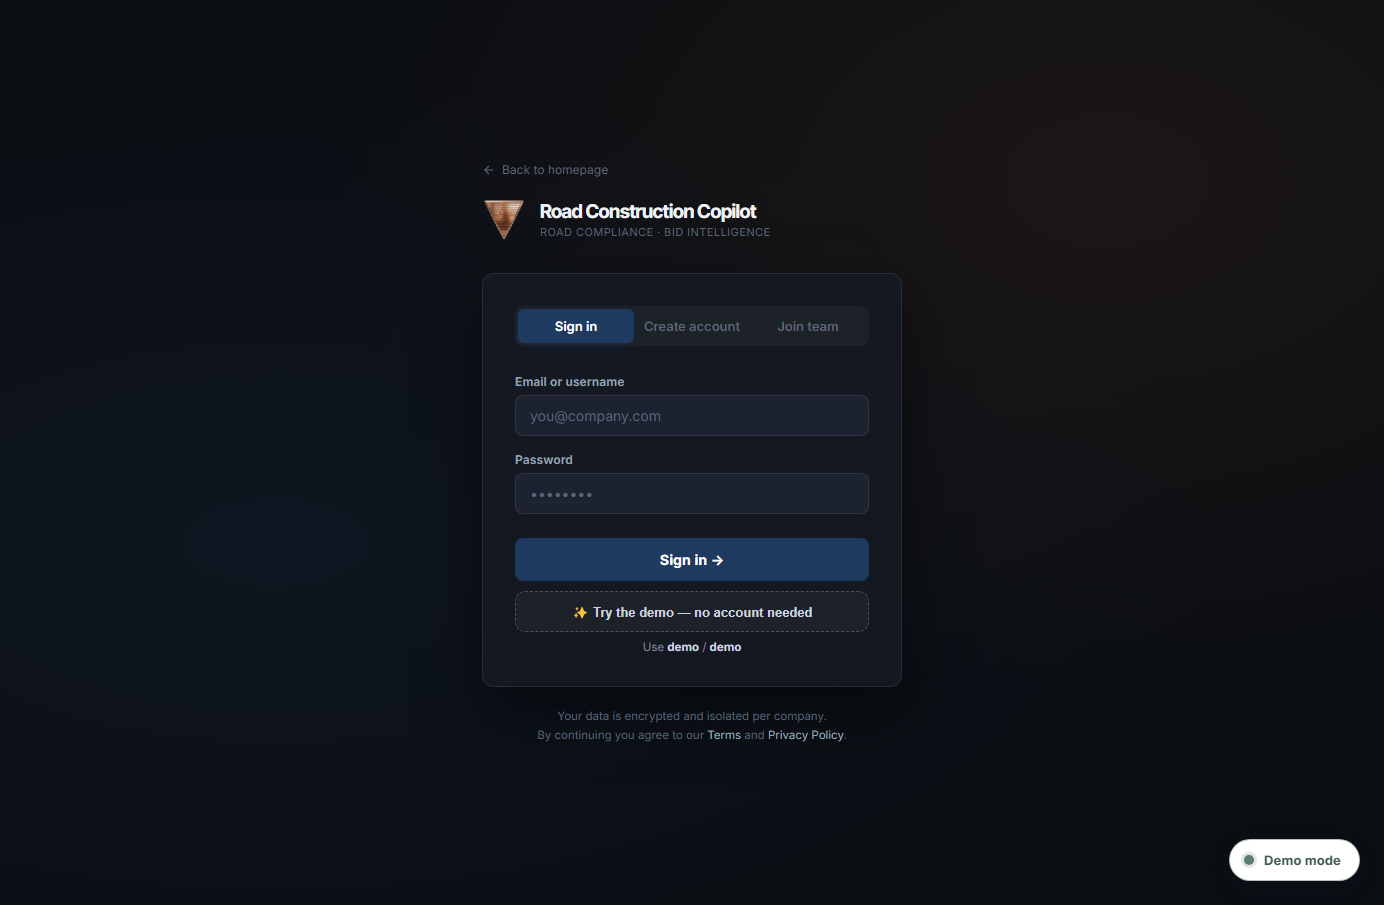
What it is: your front door. Each company has its own private workspace; you log in with your email and password. The platform even remembers you — next time it shows a “Welcome back → Continue” button so you don't retype your password.
The Sign in screen — enter your email and password, or tap “Try the demo” to explore with no account.
Open rbcopilot.com in any browser.
Type your email and password, then click Sign in.
If you've signed in before, just click Continue → on the “Welcome back” banner.
No account yet? Use Create account, or Join team if a colleague shared a company code.
✅TIP — Want to look around first? Click “Try the demo” to enter a sample workspace with example projects, no signup needed.
0.2 · The layout
The workspace: sidebar & topbar
Everywhere you go
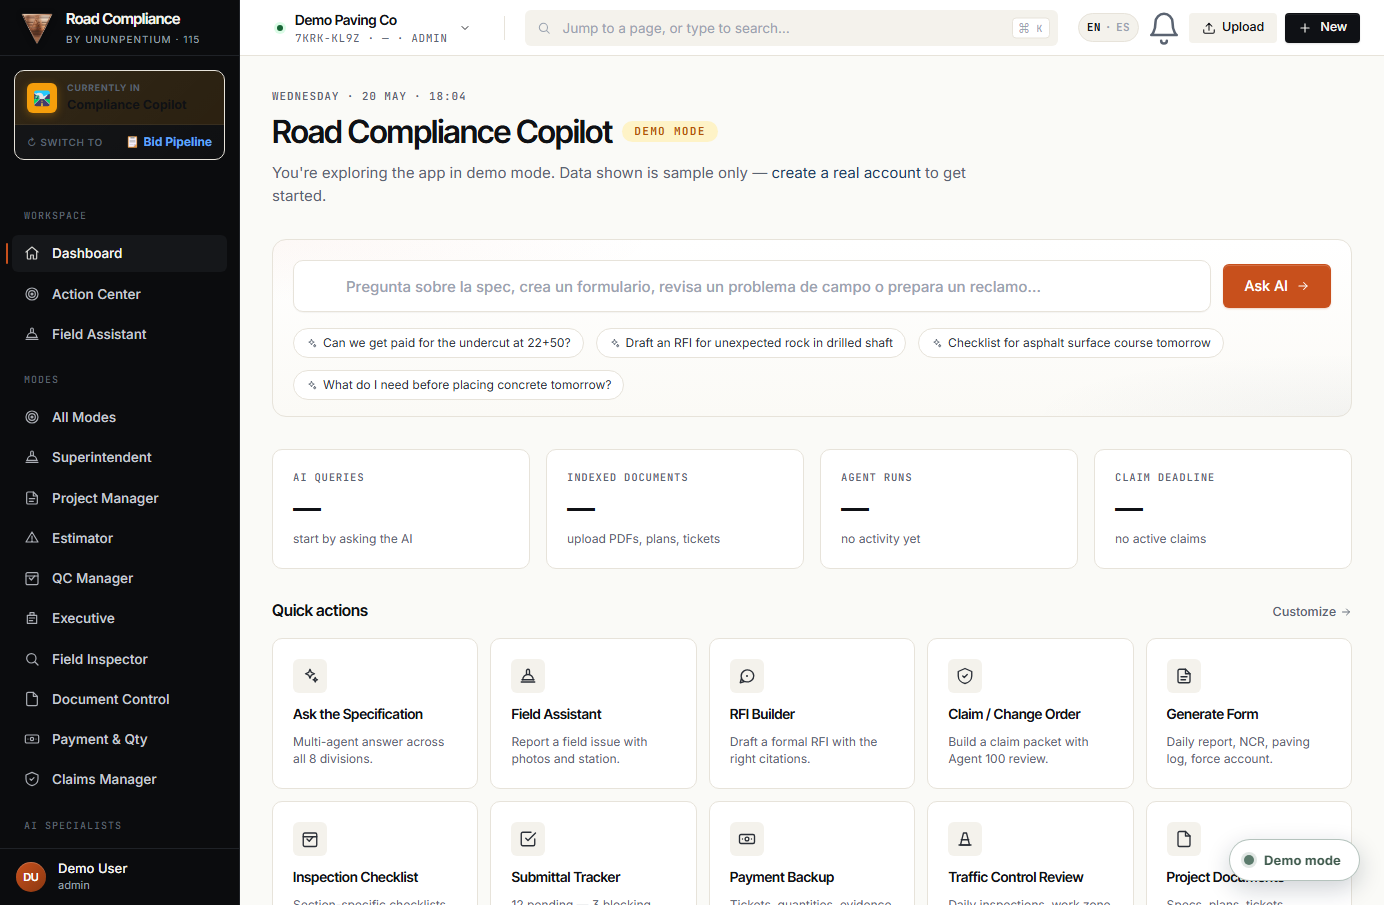
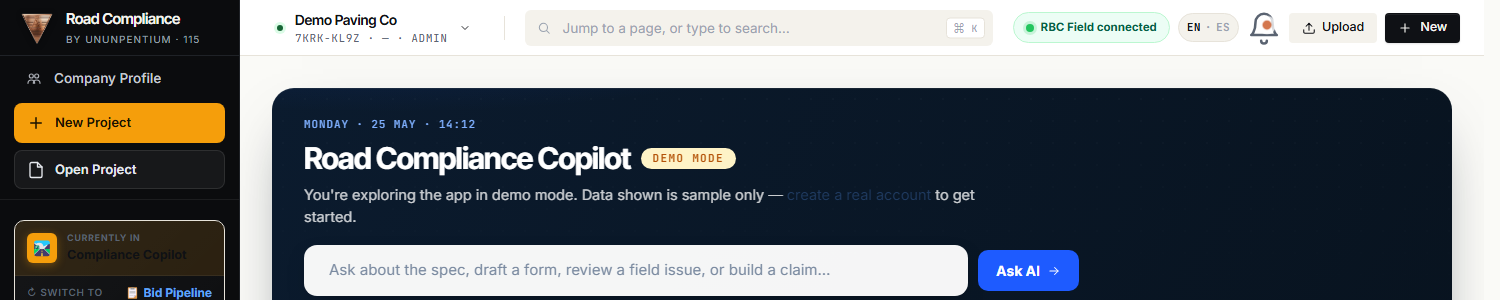
What it is: the frame around every page. The left sidebar is your menu, grouped into sections (Workspace, Modes, AI Specialists, Documentation, Operations, Insight). The top shows your company name and a search box. A switch near the top flips between the Compliance and Bid Pipeline worlds.
The sidebar (left) is grouped by job; the main area (right) shows the page you picked. Your company name sits top-left.
Use the left sidebar to move between features — they're grouped by what you're doing.
Type in the search box up top to jump straight to any page.
Use the Compliance ⇄ Bid Pipeline switch to change which set of tools is shown.
ℹ️GOOD TO KNOW — You don't have to memorize the menu. Each chapter of this manual matches a sidebar group.
0.3 · Company Profile
Company Profile — fill it in once
Sidebar → Company Profile (pinned at the top)
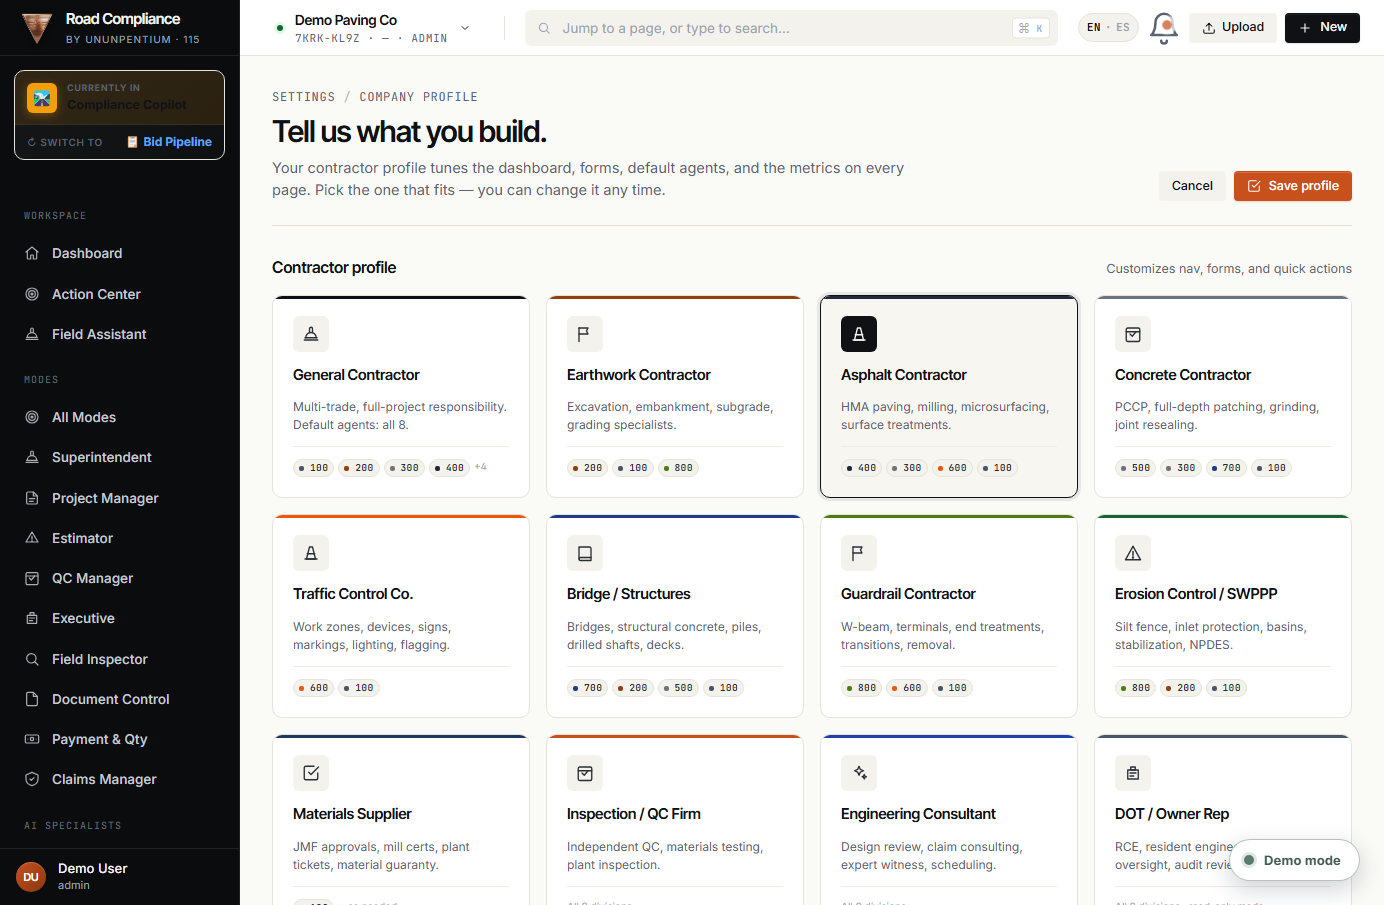
What it is: your firm's master record — legal name, license numbers, DBE status, bonding, contacts, certifications. RBCopilot uses it to auto-fill bid forms and reports, so you enter this information one time instead of on every document.
Company Profile — the more you complete here, the more the platform fills in for you later.
Open Company Profile from the top of the sidebar.
Fill in your company details, licenses, bonding and key contacts.
Click Save. That's it — these values now flow into bids and reports automatically.
⭐PRO MOVE — Complete this before your first bid. A full profile can pre-fill a large part of the 29-section bid intake for you.
01
Chapter 1
The Daily Command Center
Open these three screens every morning. They tell you what needs your attention today, where your money and risk are, and what to do next.
In this chapter
Control Center & Dashboard
Action Center
1.1 · Dashboard
Dashboard & Control Center
Sidebar → Dashboard / Control Center
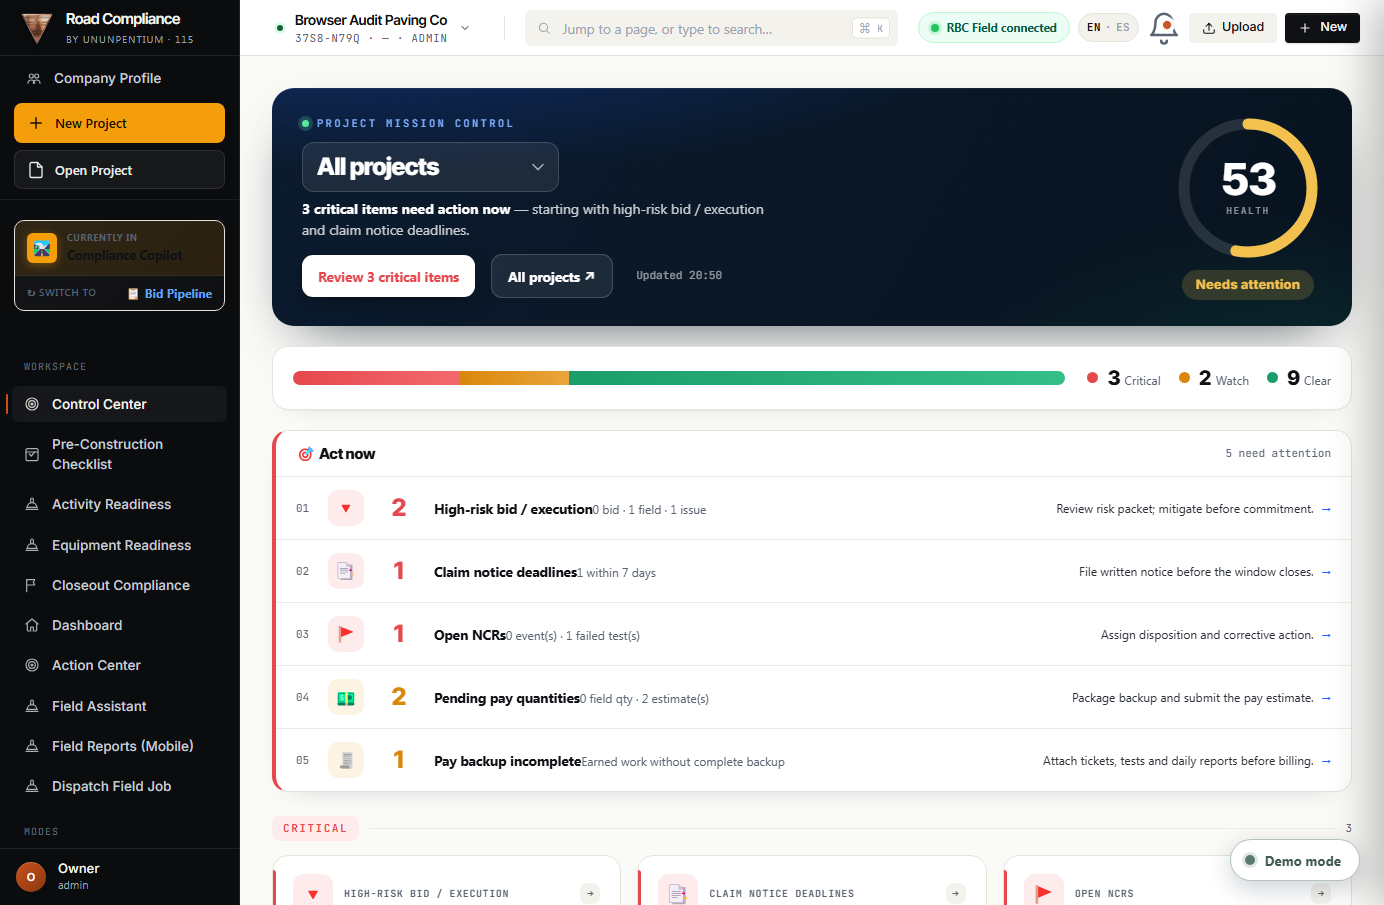
What it is: your live cockpit. In one glance you see active projects, upcoming spec deadlines, alerts that need action, and key numbers — exposure (money at risk), recovery (money you can claim back), at-risk, and pending. Everything here is computed from your real records — an empty company shows zeros, never fake data.
Project Mission Control — the Control Center: pick a project (or “All projects”) and see critical items and health at a glance.
The Dashboard — alerts, deadlines and the four money numbers, all from your live project data.
Open Dashboard each morning to see the day's picture.
Read the alert cards top-to-bottom — they're ordered by urgency (red = act now).
Click any alert's button (e.g., Open claim, Review submittal) to jump straight to the task.
⚠️WATCH OUT — Red alerts often carry a deadline (like a 36-hour claim-notice window). Miss it and you can lose the right to recover money.
1.2 · Action Center
Action Center — your single to-do queue
Sidebar → Action Center
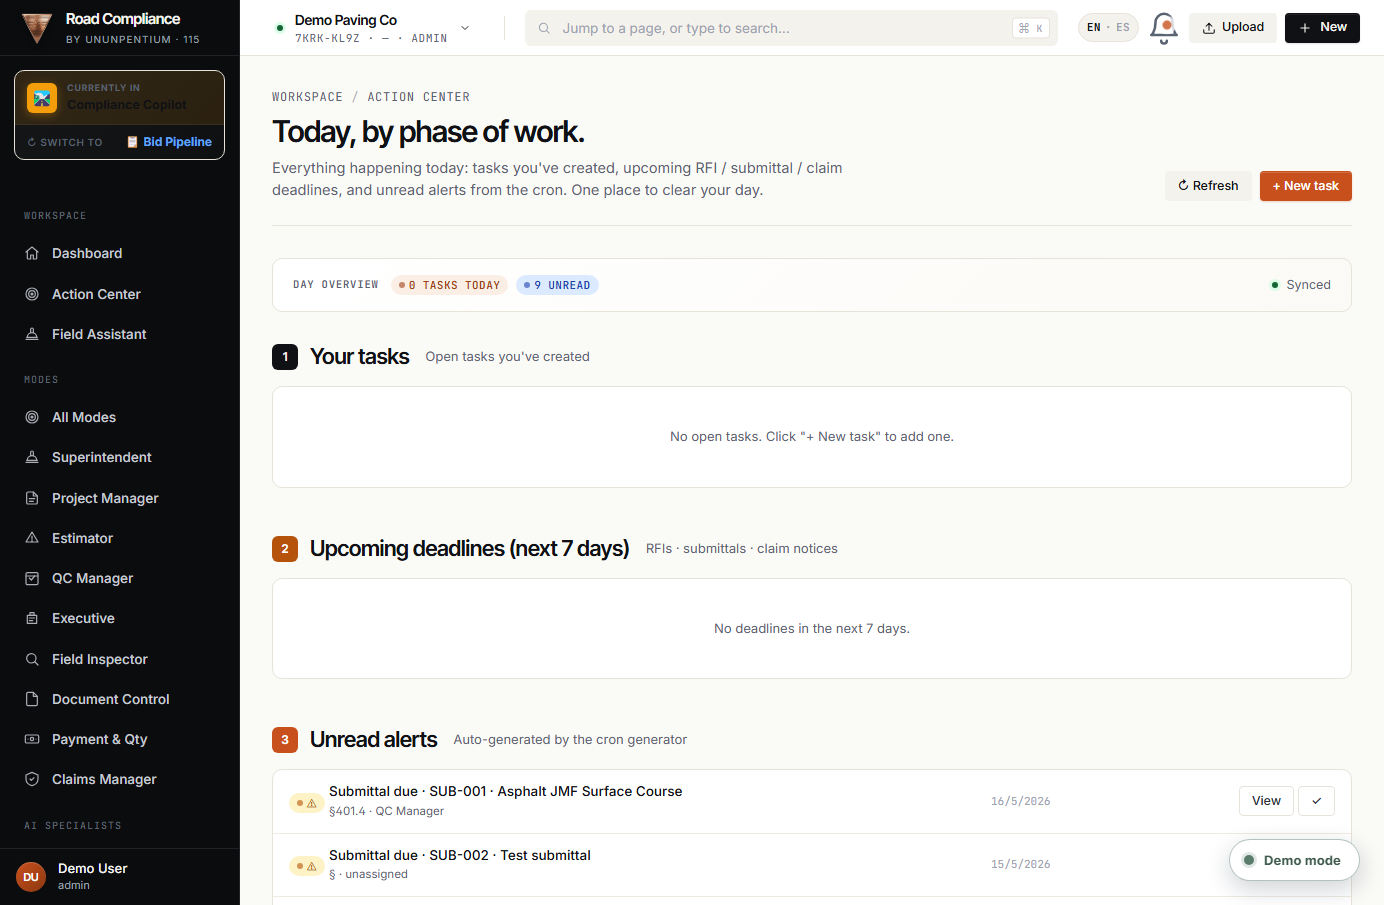
What it is: every “do this now” item from across the whole platform, gathered into one prioritized list — missing daily reports, inspections due after rain, submittals pending, claim deadlines. Instead of checking ten modules, you check one.
The Action Center collects all outstanding tasks in one place, sorted by priority.
Open Action Center.
Work the list from the top down — highest priority first.
Click an item to open it; once done, it drops off the list automatically.
✅TIP — Treat the Action Center like your inbox: get it to zero and your project is fully on top of its obligations.
02
Chapter 2
Getting Ready to Build
Before a crew rolls, prove you're cleared to work. These checklists stop “we can't pave because the mix isn't approved” surprises.
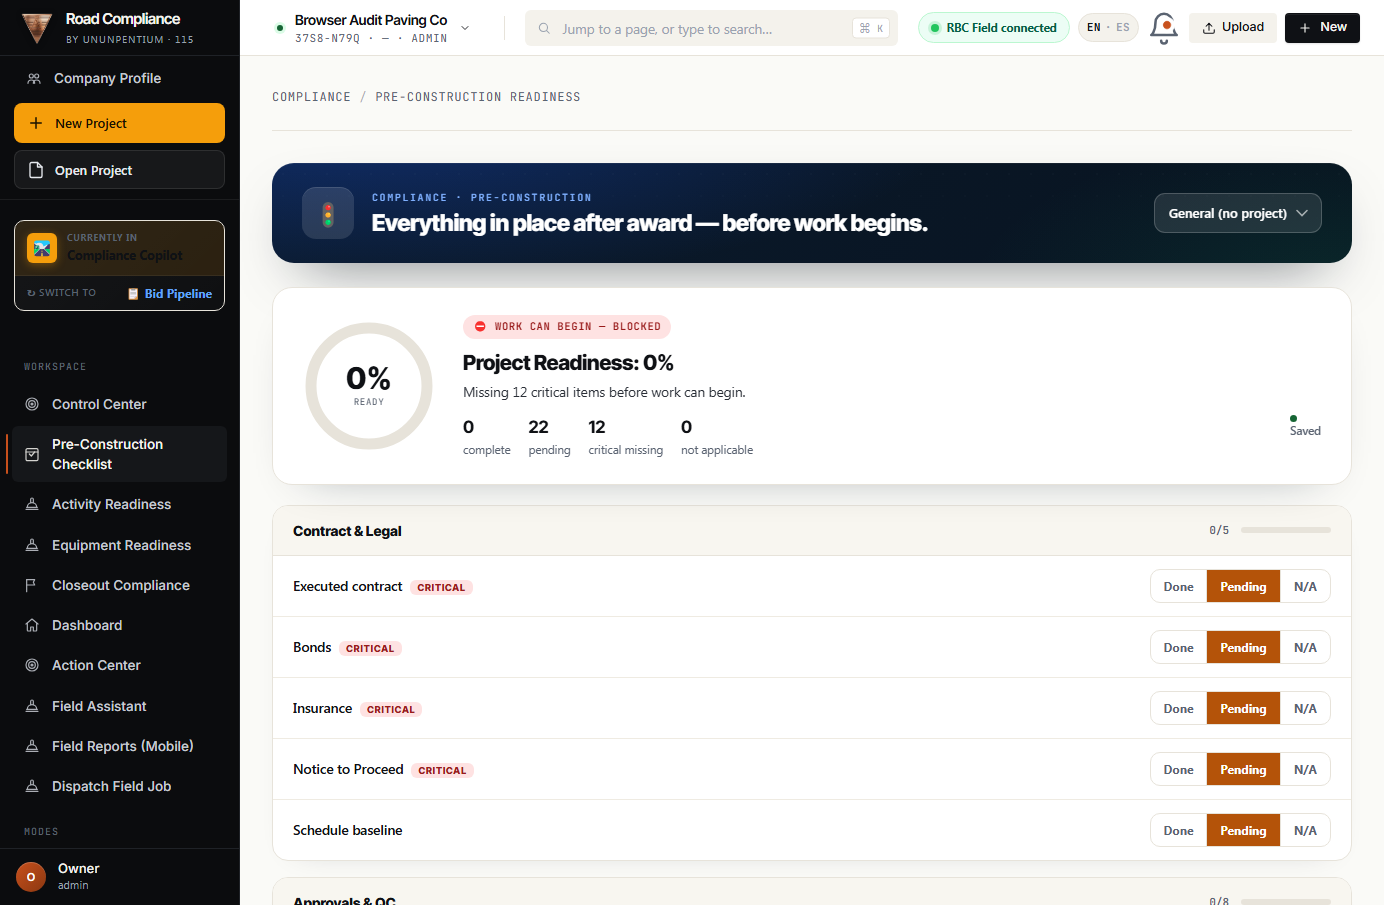
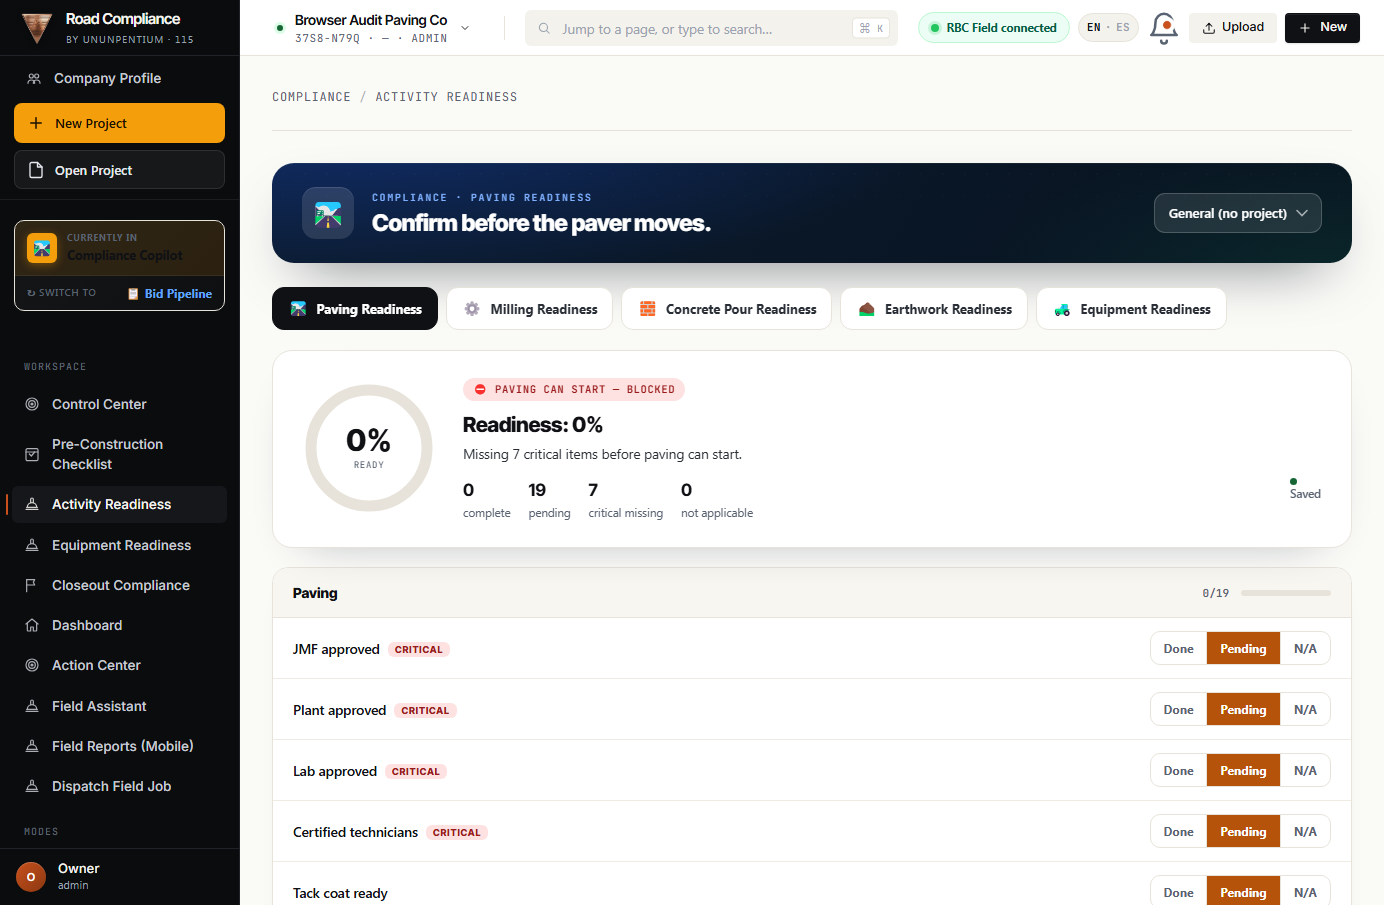
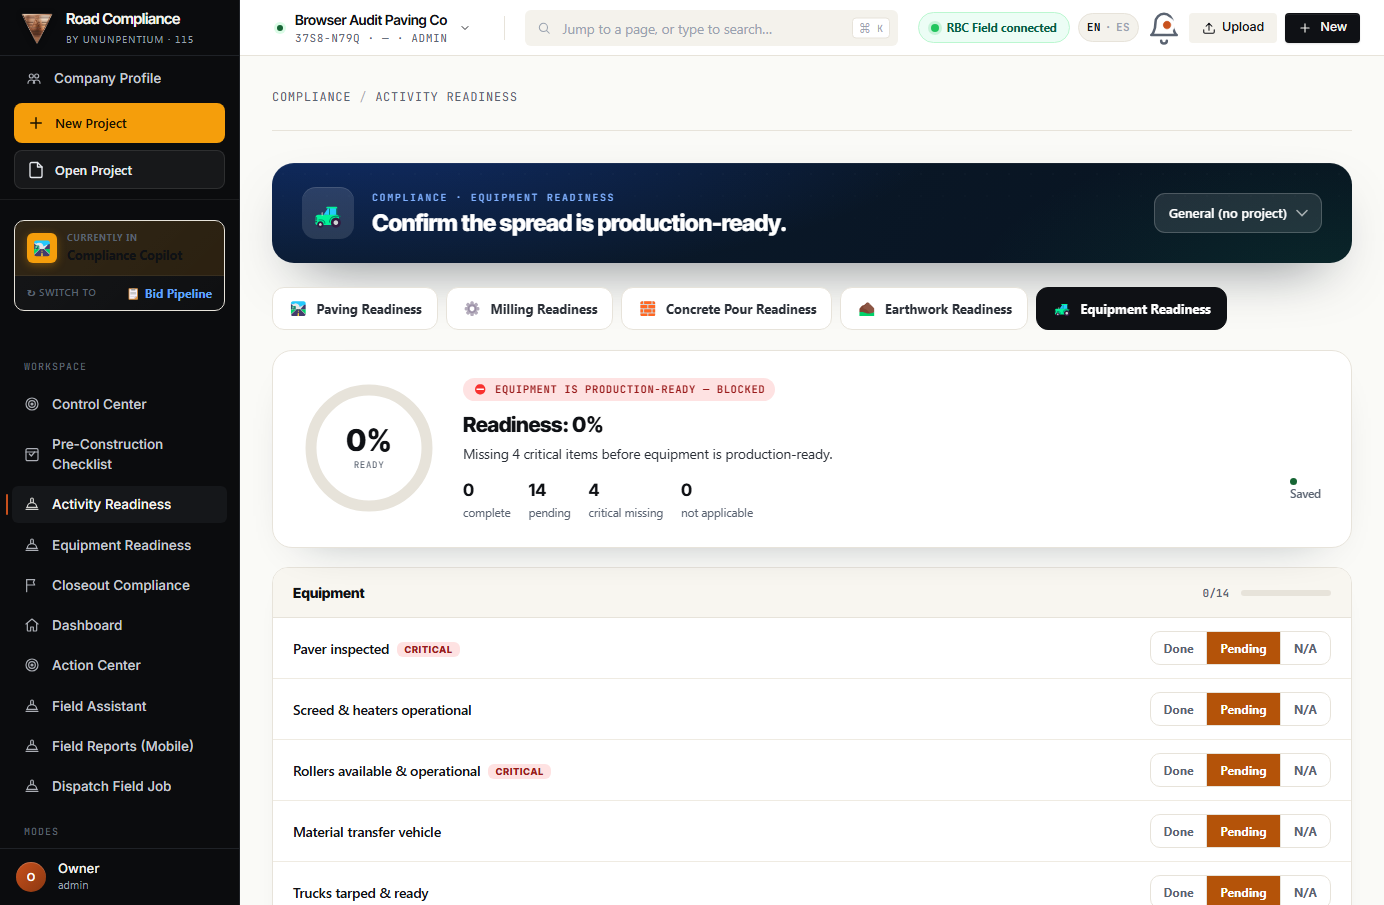
What it is: a set of “are we cleared to start?” gates.
Pre-Construction Checklist — everything that must be true before mobilizing: submittals approved, permits in hand, mix designs, traffic plans, bonds.
Activity Readiness — per-activity gates (e.g., “can we pave tomorrow?”).
Equipment Readiness — is the equipment available and in condition for the scheduled work?
Pre-Construction Checklist — everything that must be true before you mobilize.
Activity Readiness — per-activity “cleared to start?” gates.
Equipment Readiness — is the equipment available and in condition for the work?
Open the relevant checklist before scheduling the work.
Tick off each requirement; anything missing is flagged.
Only start the activity once its readiness gate is green.
⭐PRO MOVE — Run the Pre-Construction Checklist at the kickoff meeting; it doubles as your agenda.
2.2 · Closeout
Closeout Compliance
Sidebar → Closeout Compliance
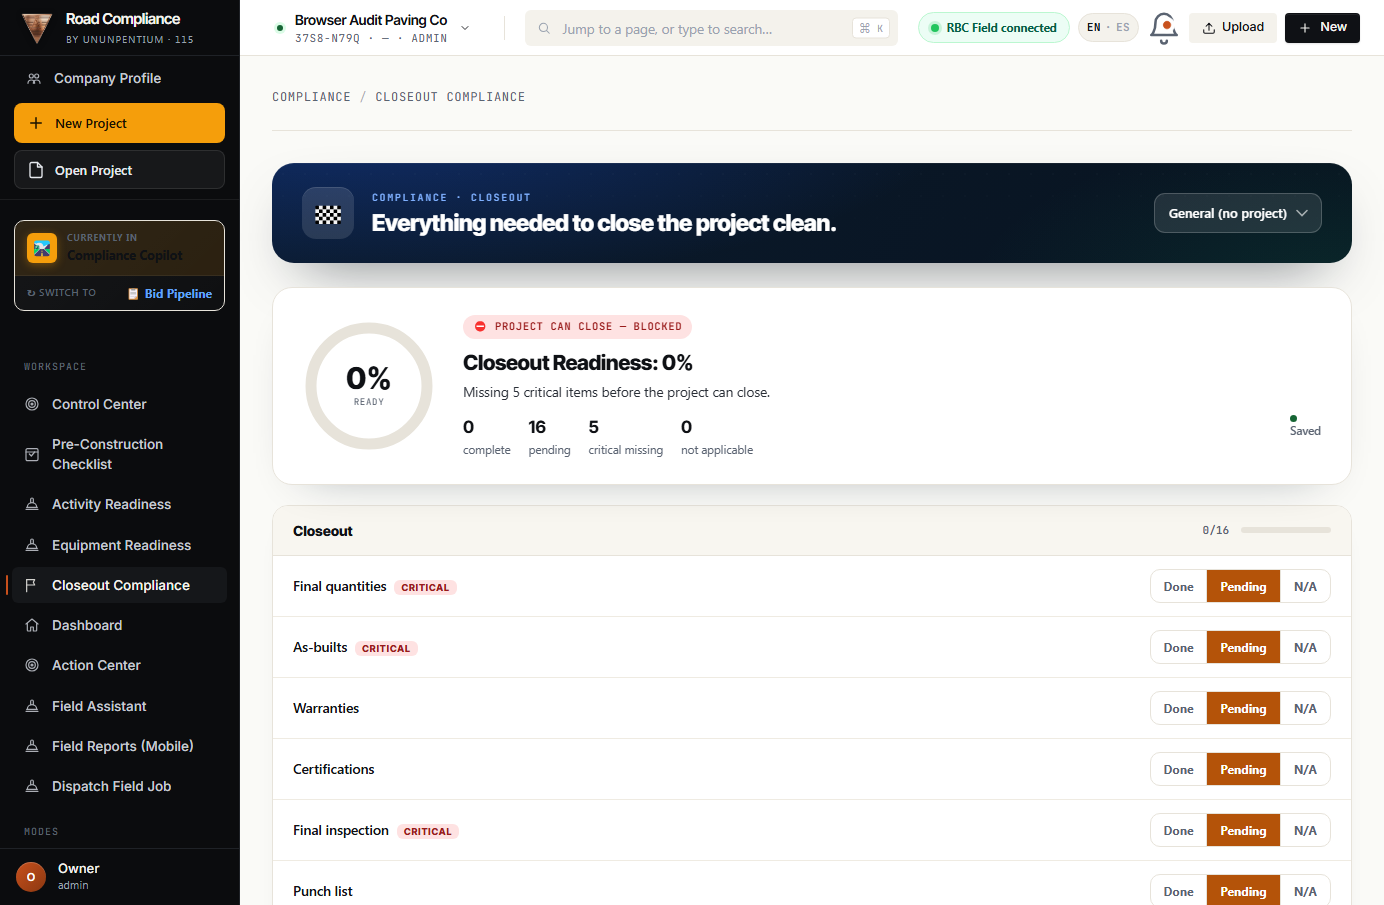
What it is: the punch-list to final acceptance and final payment — every document and sign-off the agency needs before they release your retainage. Blockers are only flagged when a checklist actually has progress, so a brand-new project shows a clean slate.
Closeout Compliance — the road to final acceptance and release of retainage.
Open Closeout Compliance as the project nears completion.
Work through each closeout requirement; the screen shows what's still blocking final payment.
Clear every blocker to reach 100% and request final acceptance.
⚠️WATCH OUT — Closeout items left undone are the #1 reason final payment gets held. Start this list early, not at the end.
03
Chapter 3
The Role Modes
A “Mode” is a screen built for one job. Instead of a giant menu, each role gets a cockpit with exactly the buttons they need. Same data underneath — different lens on top.
Field Inspector · Document Control · Payment & Qty · Claims Manager
3.0 · Modes hub
All Modes — pick your cockpit
Sidebar → Modes → All Modes
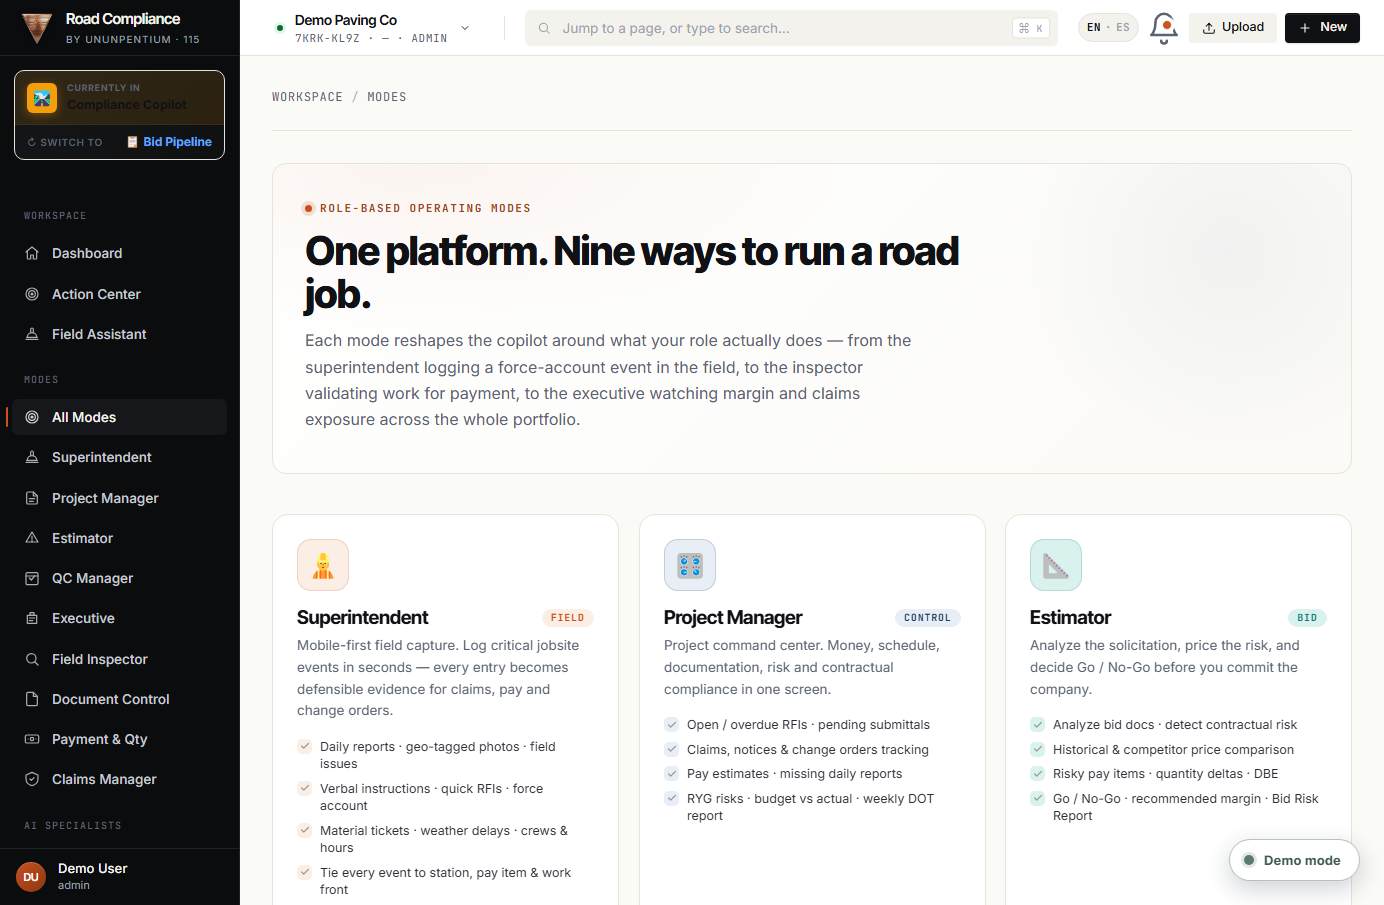
What it is: the launcher. Choose the mode that matches your role and you get a screen tailored to it. You can switch modes anytime.
The Modes hub — one tile per role. Tap the one that's you.
ℹ️GOOD TO KNOW — Everything you do in a Mode flows into the same shared records, so the PM sees what the Superintendent logged, instantly.
3.1 · Superintendent
Superintendent Mode
Sidebar → Modes → Superintendent
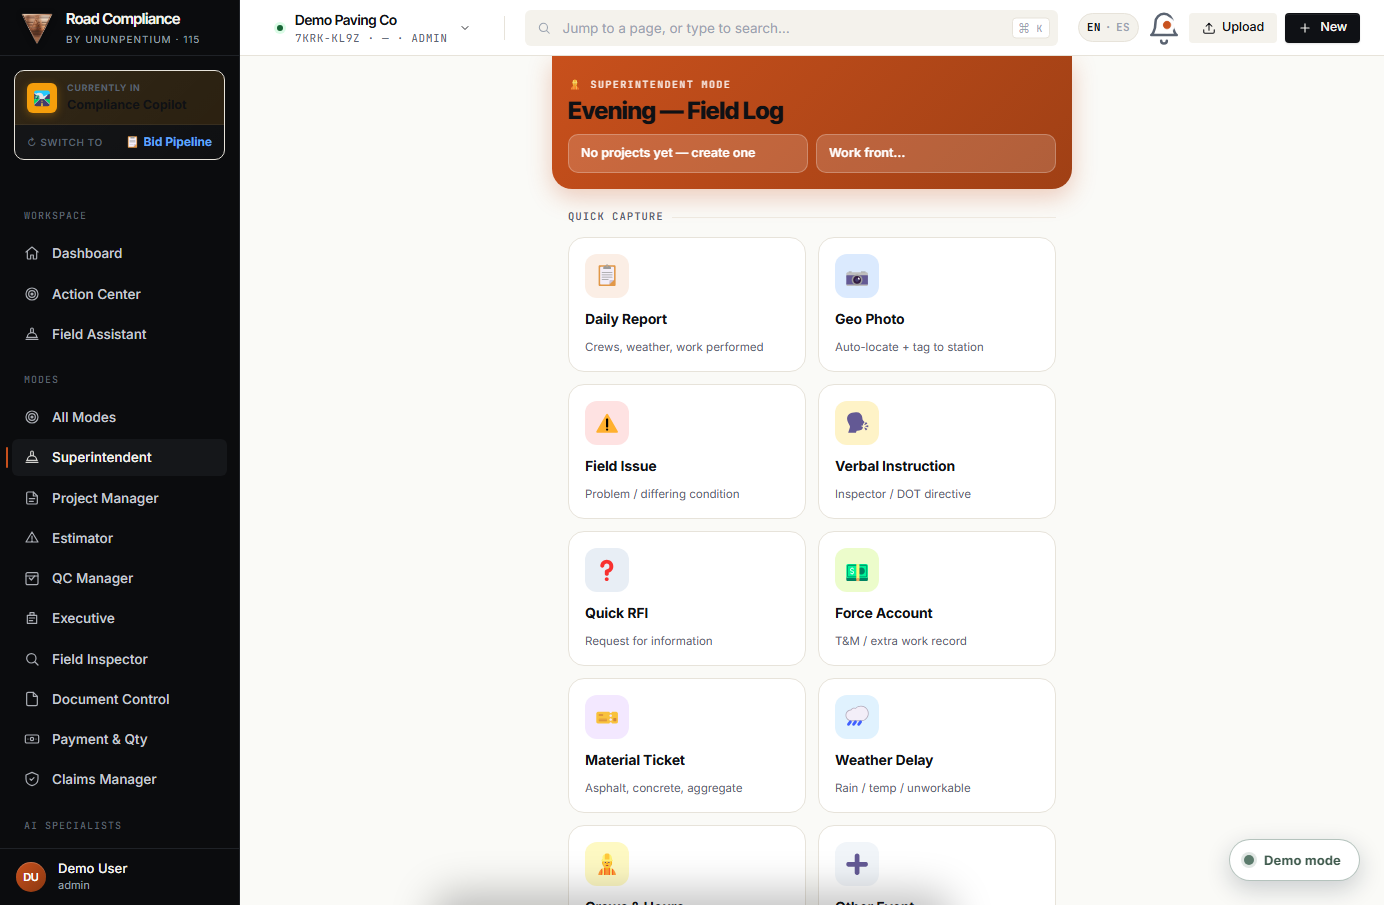
What it is: a fast, phone-style screen for the person on site to log what happened — delays, extra work, issues — straight into the platform's event stream.
Superintendent Mode — big buttons to record a field event in seconds.
Open Superintendent mode.
Tap the event type (delay, extra work, issue…) and add a short note.
Save — it instantly becomes a tracked event the office can act on.
3.2 · Project Manager
Project Manager Mode
Sidebar → Modes → Project Manager
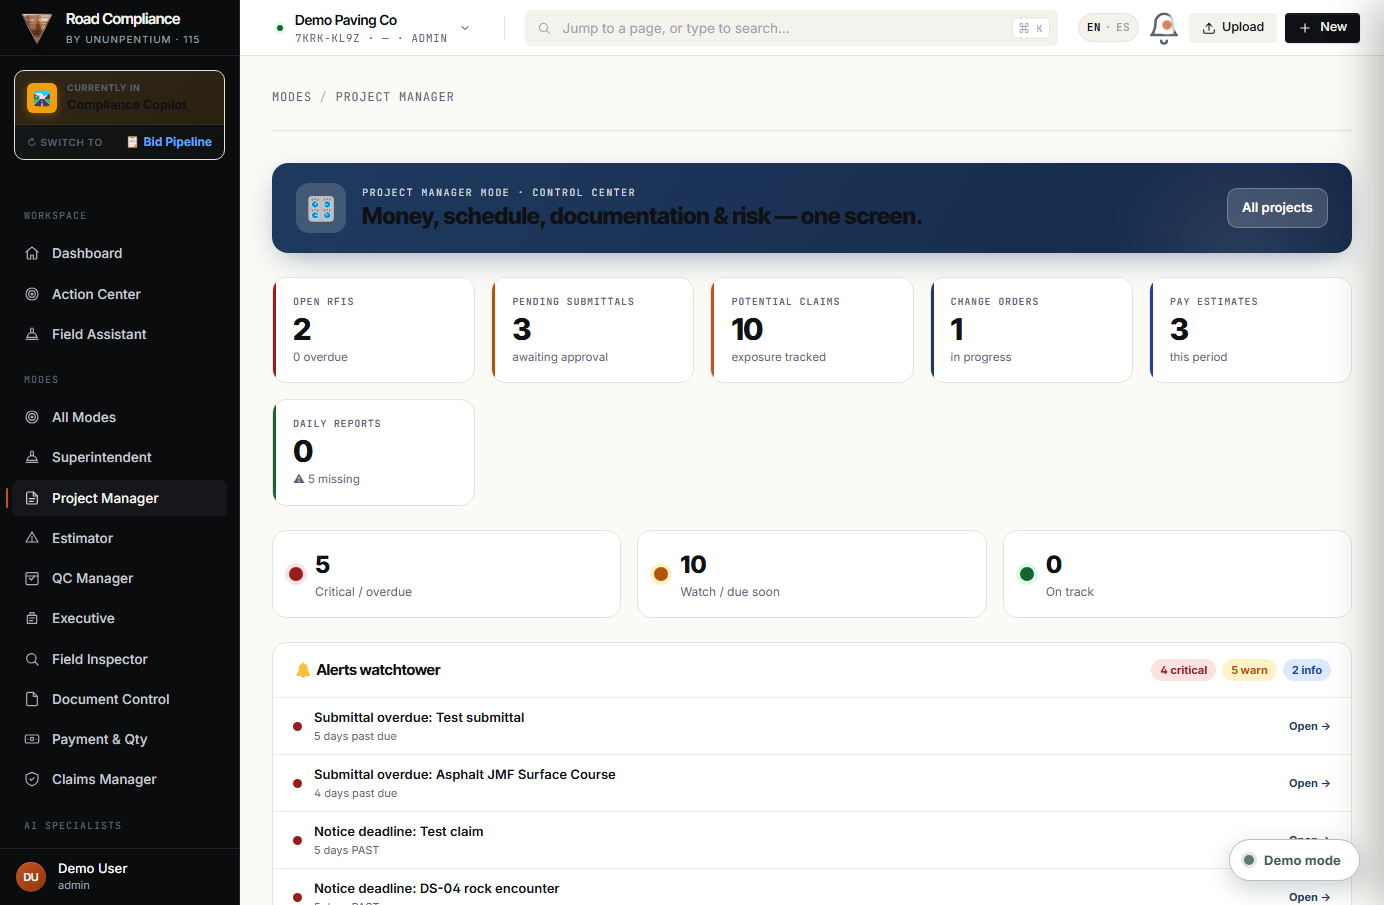
What it is: the control room. A Field Events inbox where the PM triages everything the field logged — with one-tap actions: Approve, Escalate, Mark Claim Potential, Request More Evidence, Close. You can filter by status, see a full timeline of every change, and link an event to a Notice or Change Order, or send it to Document Control.
PM Mode — the field-events inbox with triage actions and a status timeline.
Open Project Manager mode to see the events inbox.
Open an event and choose an action: Approve, Escalate, Mark Claim Potential, etc.
Link it to a Notice/CO or Send to Document Control when needed.
Use the status filter to focus (e.g., only “claim potential”).
⭐PRO MOVE — “Mark Claim Potential” the moment something looks like extra cost. The platform then collects the evidence as the event evolves.
3.3 · Estimator & 3.4 · QC Manager
Estimator & QC Manager Modes
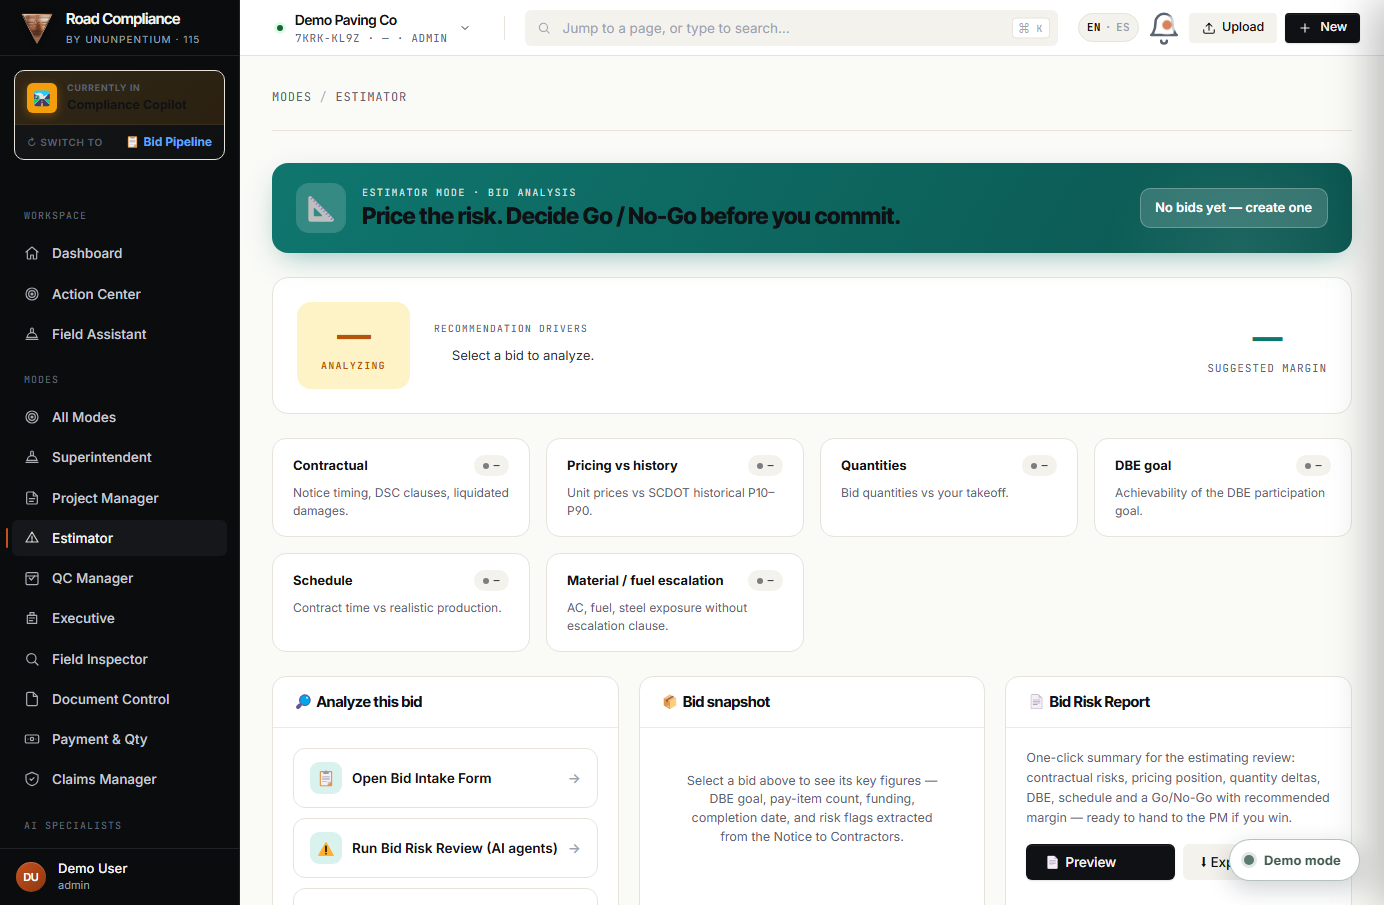
Estimator Mode — bid analysis: upload material quotes and compare your cost inputs vs. the pay items so you know your margin before you commit.
Estimator Mode — material quotes and cost-vs-pay-item comparison.
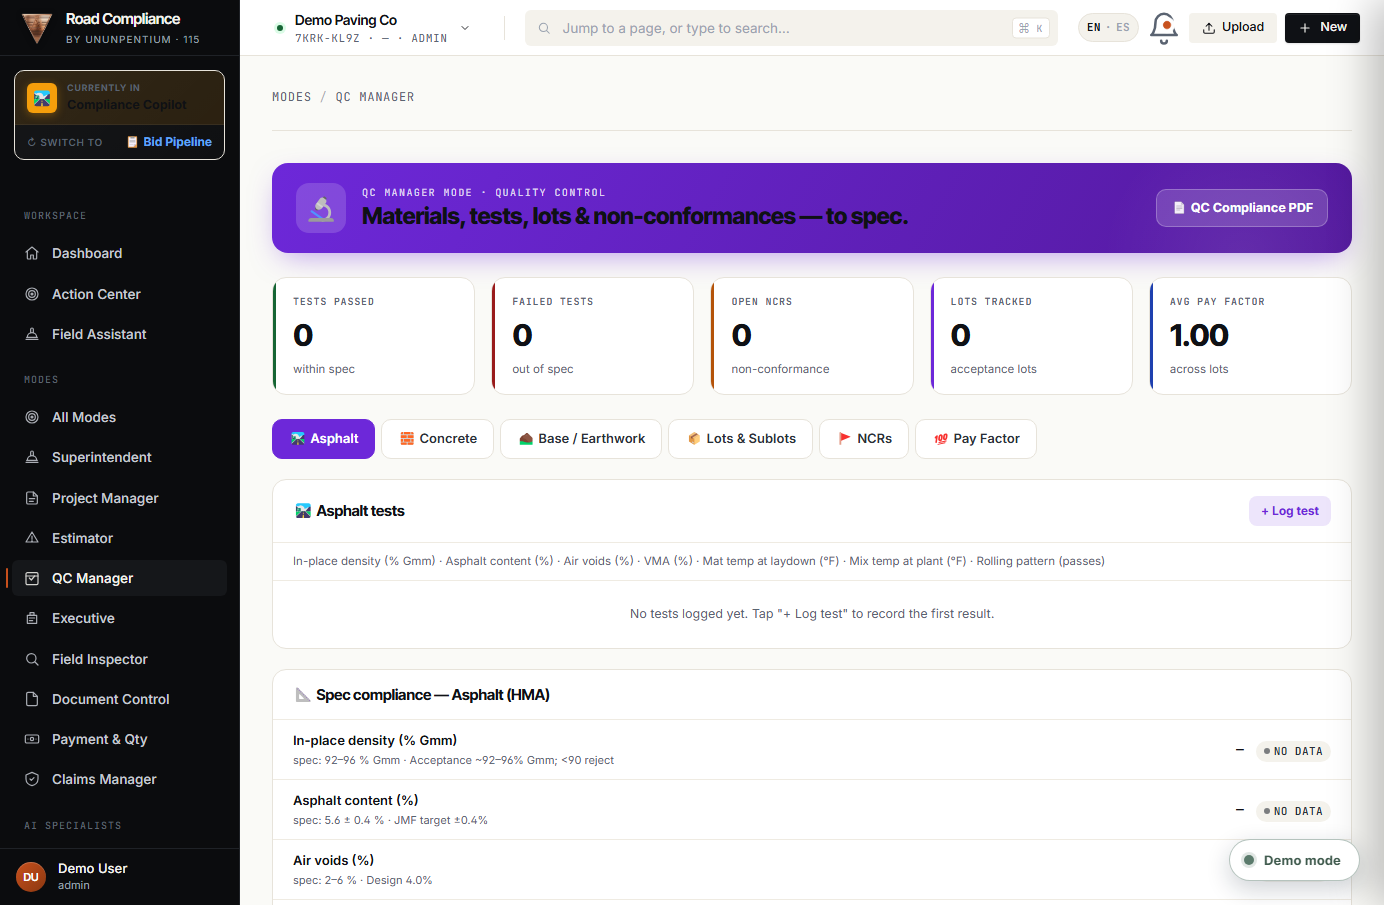
QC Manager Mode — quality control: log tests and NCRs (non-conformance reports) with per-test action menus, tied to your QC/QA records.
QC Manager Mode — tests, NCRs and quality actions in one place.
3.5 · Executive & 3.6 · Field Inspector
Executive & Field Inspector Modes
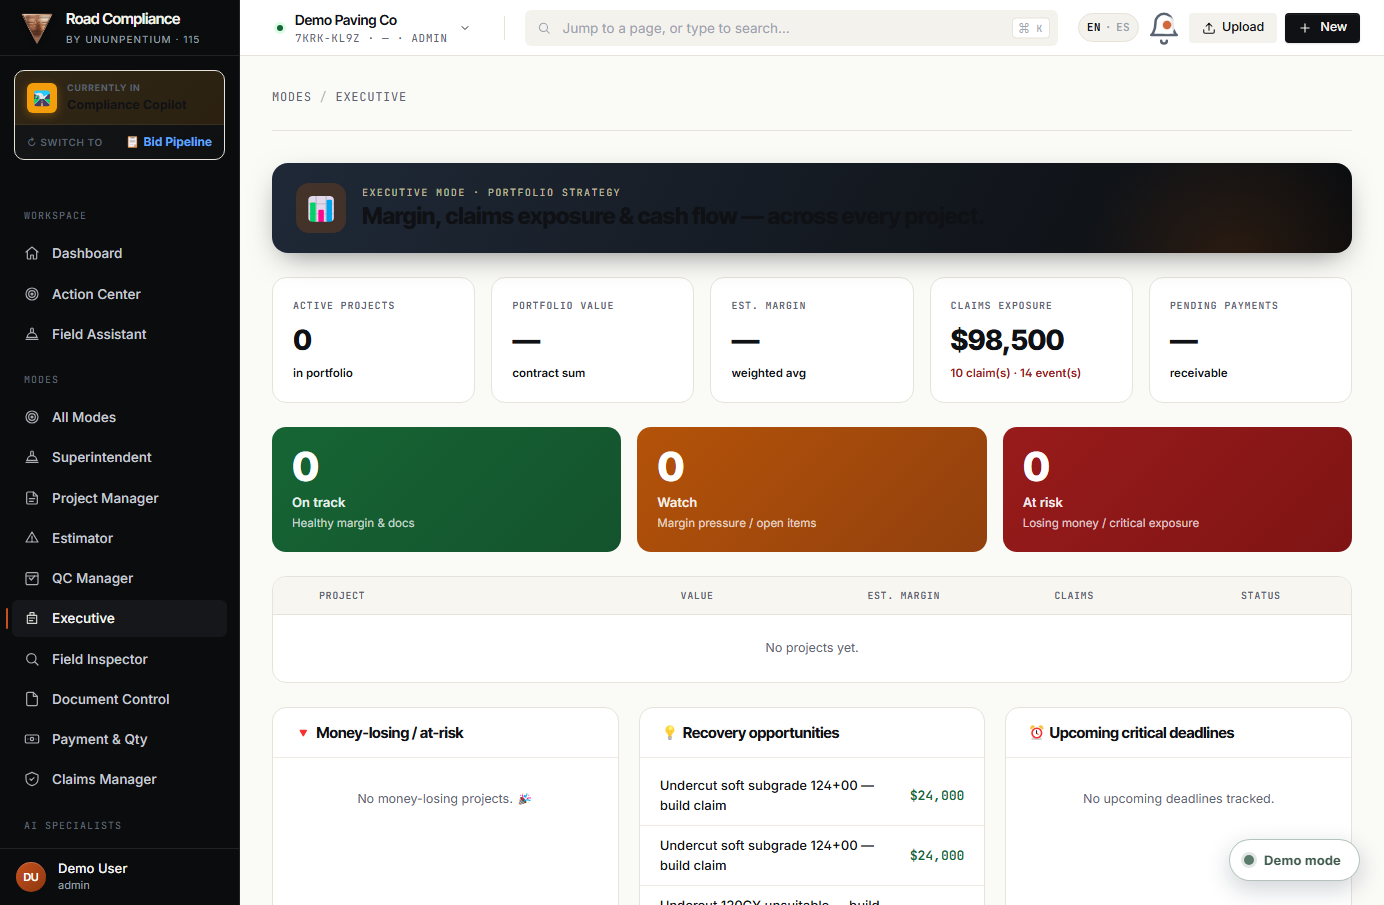
Executive Mode — the 30,000-foot view: exposure, recovery, at-risk and pending across all your projects, for owners and senior leaders.
Executive Mode — portfolio-level money and risk at a glance.
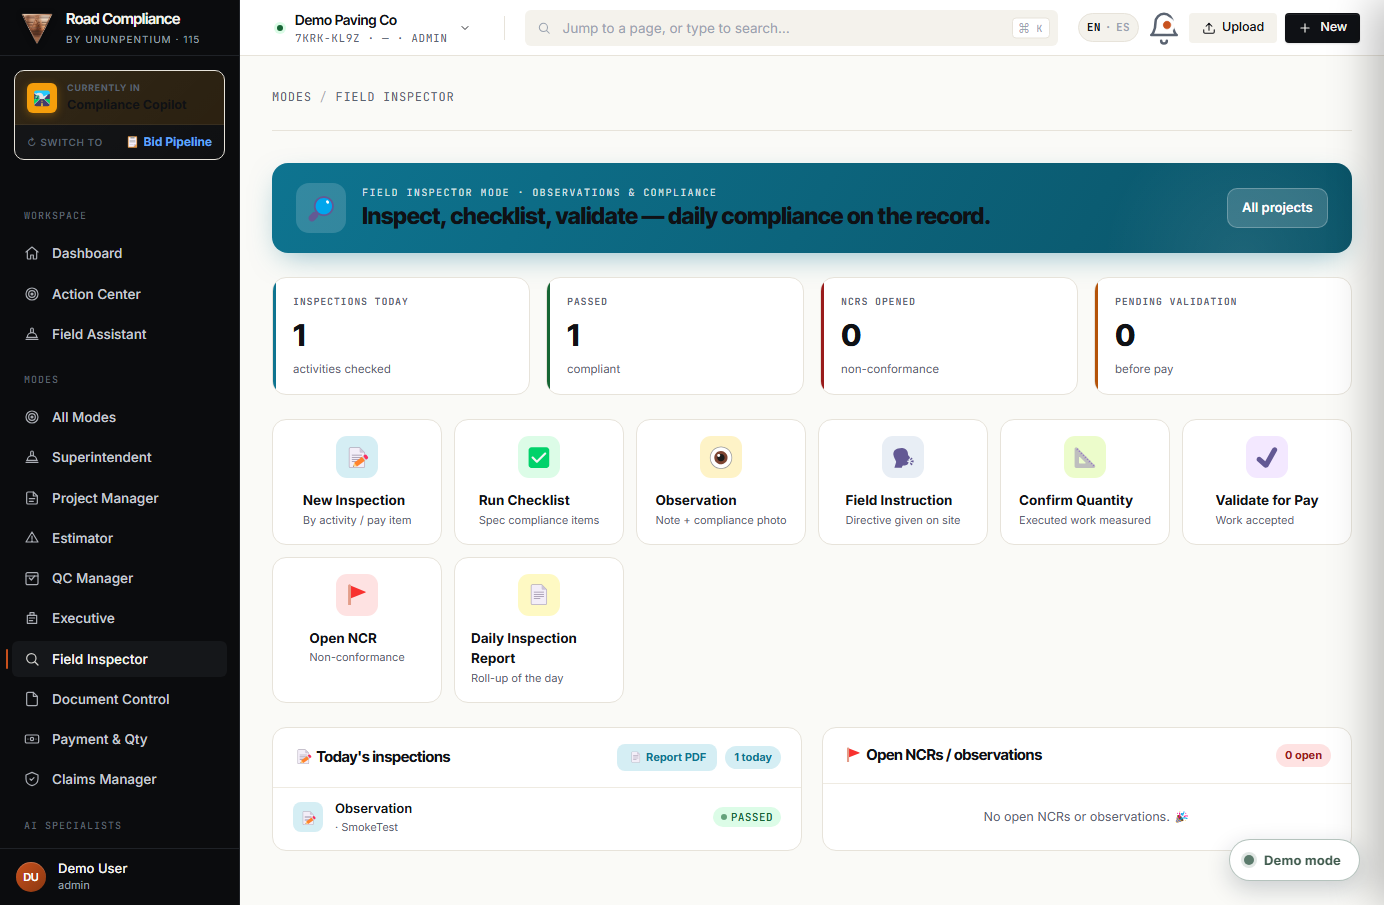
Field Inspector Mode — capture inspections in the field; they route straight into the universal event stream the PM works from.
Field Inspector Mode — inspection capture that feeds the office instantly.
3.7 · Document Control & 3.8 · Payment
Document Control & Payment & Qty Modes
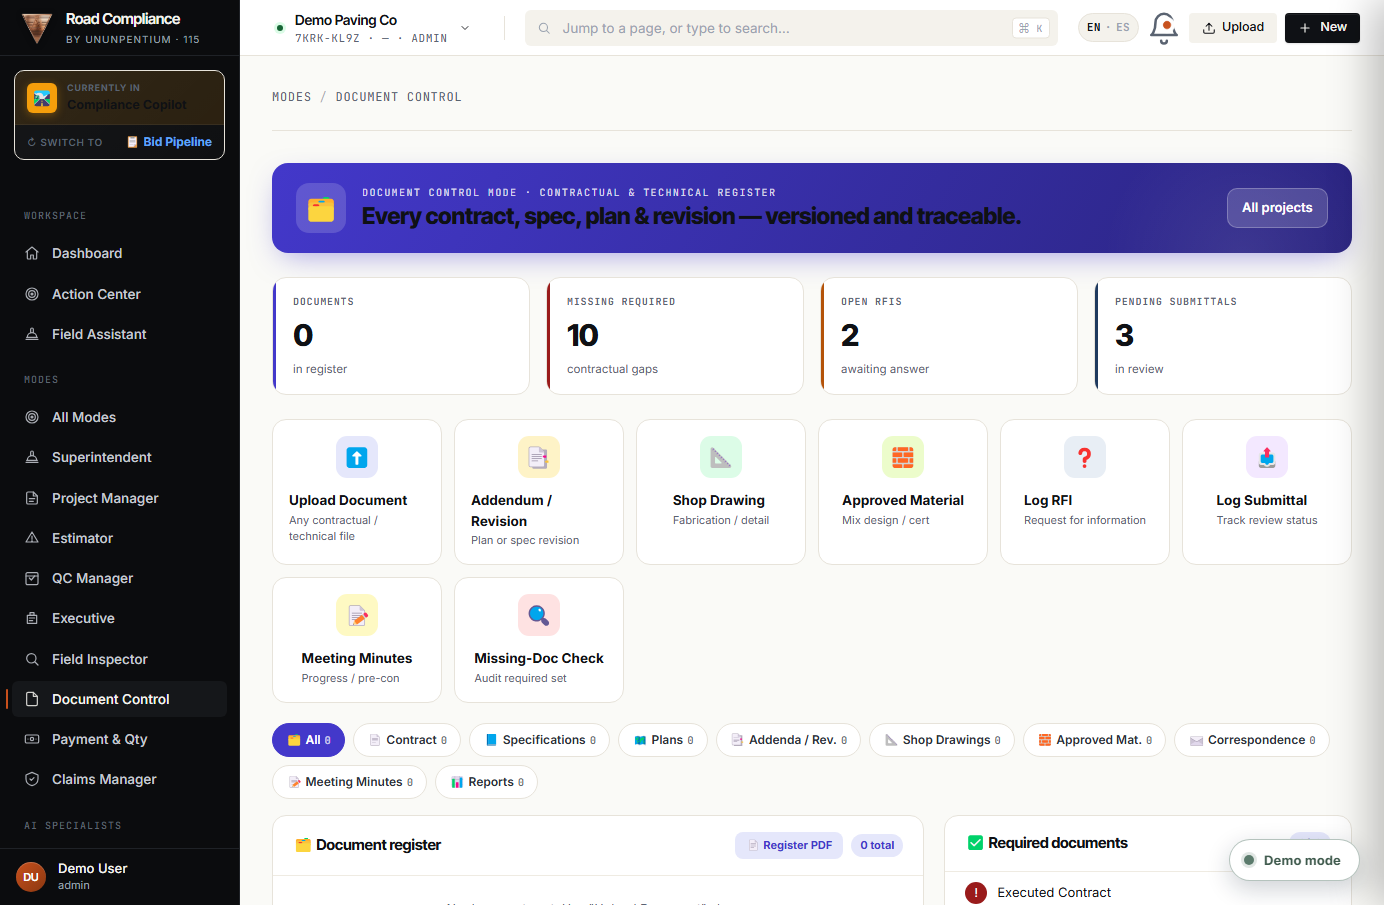
Document Control Mode — a field-events inbox focused on paperwork: attach the right plans and documents to each event and keep the record complete.
Document Control Mode — attach documents/plans to events.
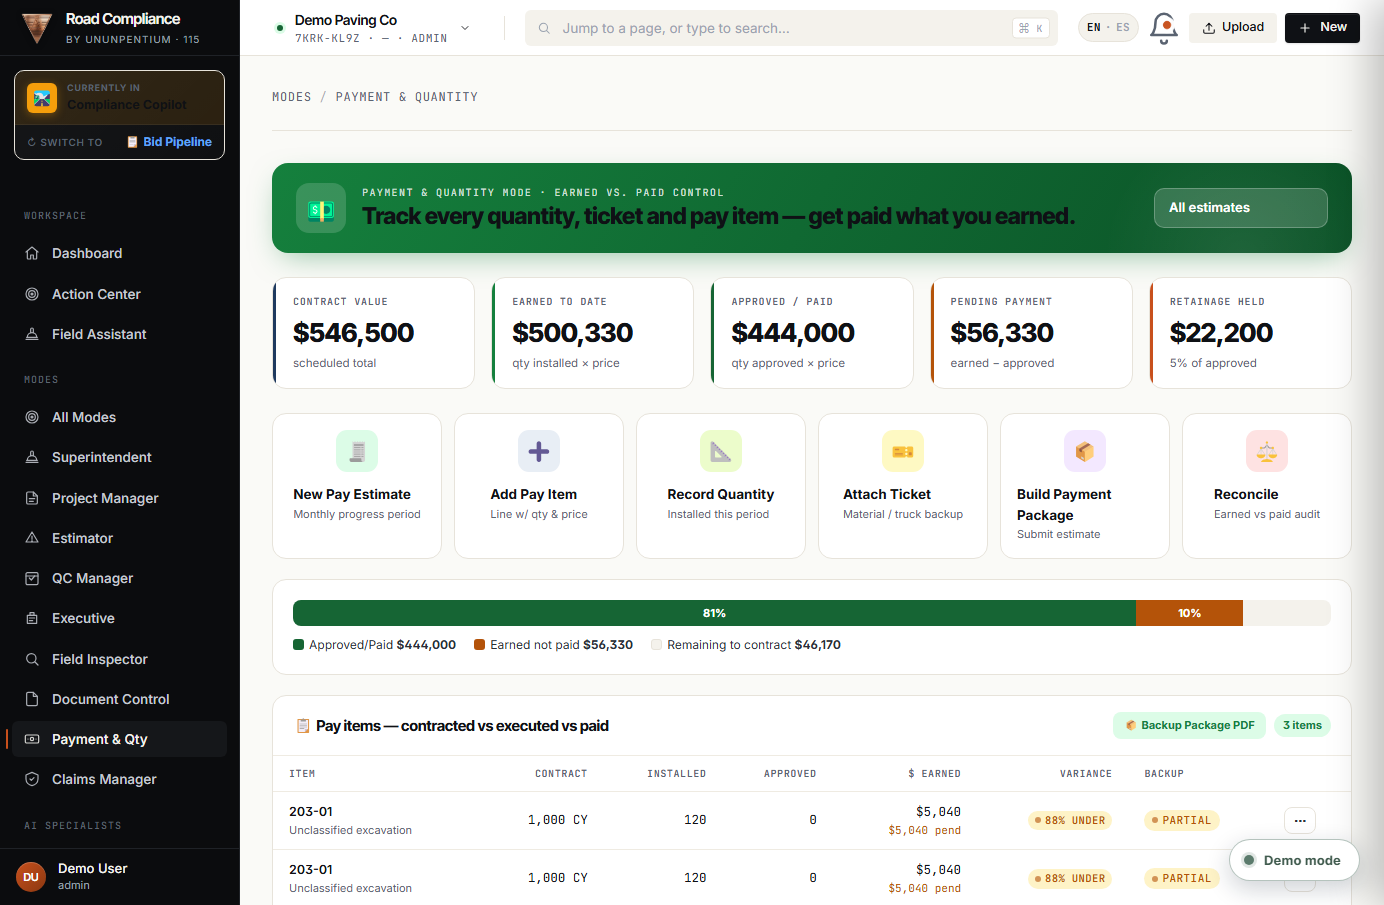
Payment & Qty Mode — approve placed quantities (“quantity pending approval”), use per-pay-item action menus, and compare cost inputs vs. pay items. This is where field production turns into money owed.
Payment & Qty Mode — approve quantities and tie them to pay items.
3.9 · Claims Manager
Claims Manager Mode
Sidebar → Modes → Claims Manager
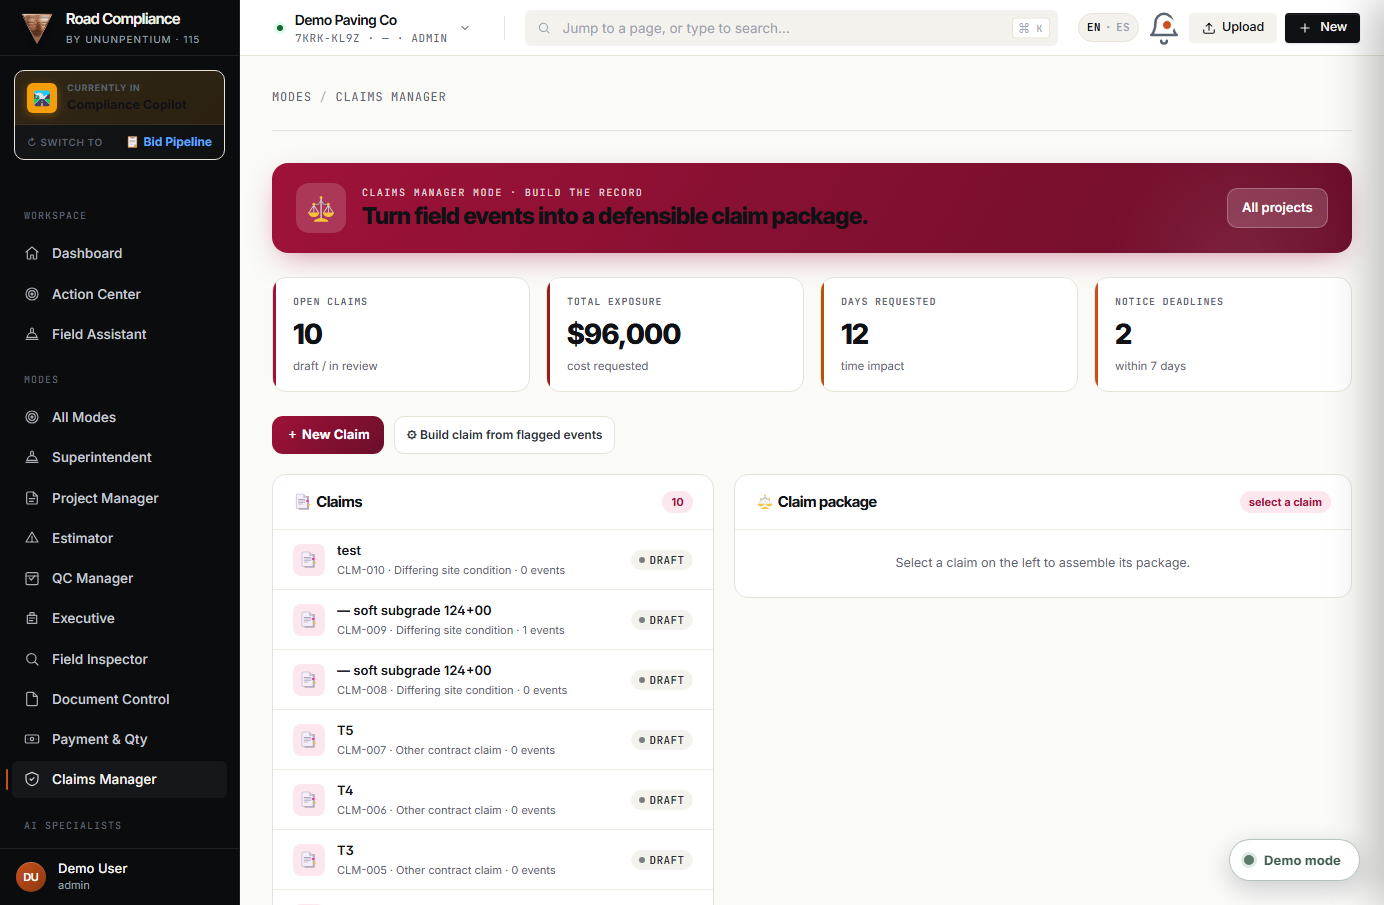
What it is: the money-recovery engine. It rolls a whole event timeline — notes, photos, tickets, inspections — into a claim package, scores your entitlement with a checklist, and exports a ready-to-submit entitlement PDF. There's also an OCR ticket-scan helper for material tickets.
Claims Manager — build a scored, documented claim from the event timeline.
Open Claims Manager and pick the event(s) behind the claim.
Work the Entitlement Checklist — each box raises your score and strengthens the claim.
Export the entitlement PDF and submit it to the agency.
⭐PRO MOVE — A higher entitlement score = a stronger negotiating position. Aim to fill every checklist item before submitting.
04
Chapter 4
The AI Specialists
RBCopilot includes a team of AI experts, each trained on one division of the SCDOT specifications. They're not a generic chatbot — they give spec-correct answers and pre-built actions.
In this chapter
Agents by Division (100–800)
Specifications browser
4.1 · Agents
Agents by Division
Sidebar → AI Specialists → Agents by Division
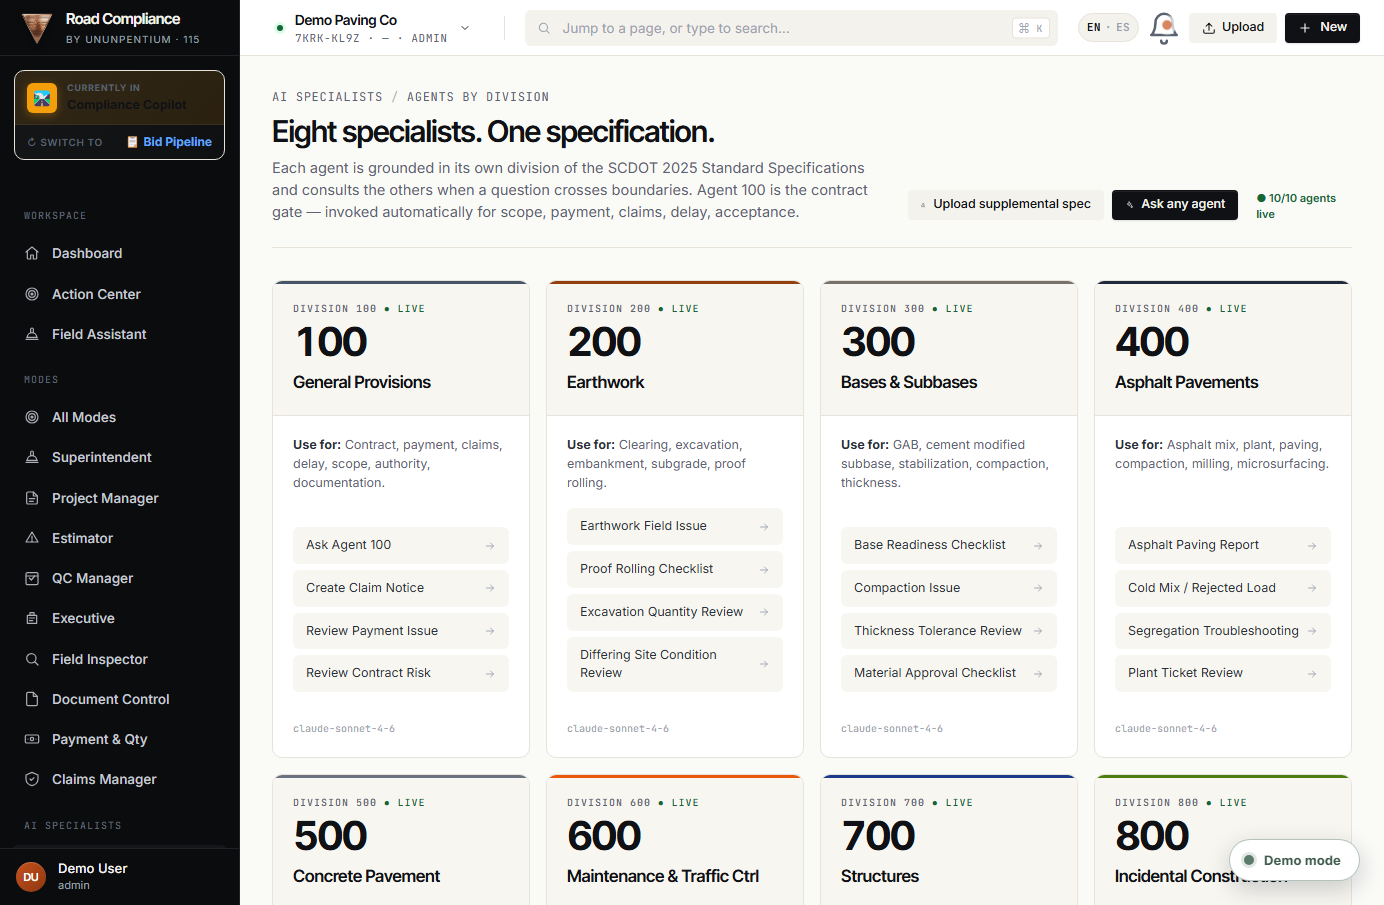
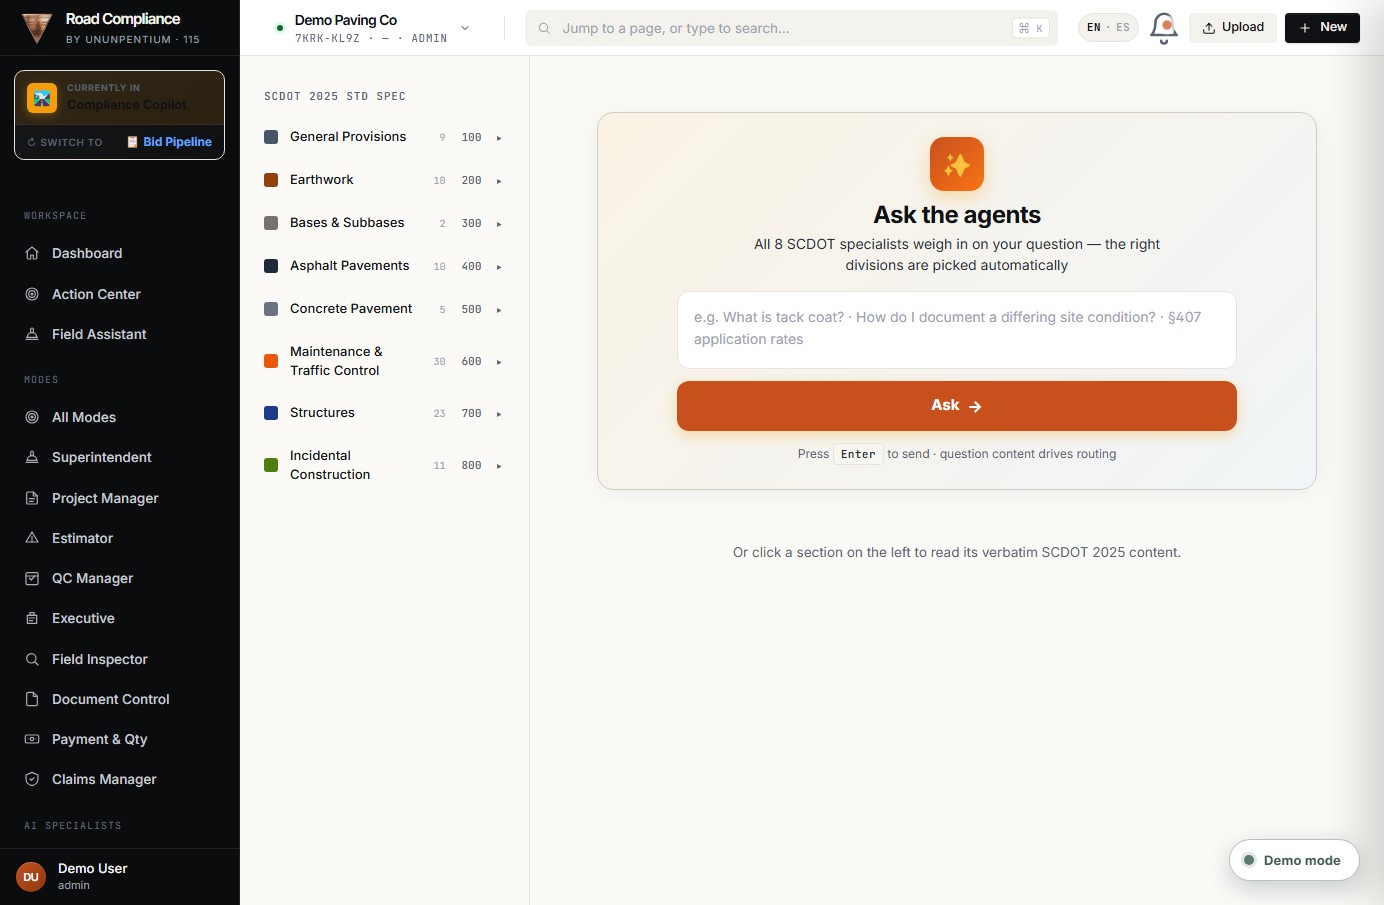
What it is: eight division experts plus a Bid Orchestrator. Each knows its part of the spec — Earthwork (200), Asphalt (400), Structures (700), and so on — and offers concrete actions like “Asphalt Paving Report”, “Differing Site Condition Review”, or “Drilled Shaft RFI”.
The AI specialists — one expert per SCDOT division, each with ready-made actions.
Open Agents by Division.
Pick the agent for your topic (e.g., Agent 400 for asphalt).
Choose a pre-built action or ask your own question — answers are grounded in the spec.
ℹ️GOOD TO KNOW — The agents carry verified facts (for example, the correct tack-coat rate under §401.3.13), so they won't hand you a wrong number.
4.2 · Specifications
Specifications browser
Sidebar → AI Specialists → Specifications
What it is: the underlying spec library the agents read from — browse the obligations and requirements directly when you want to see the source.
Browse the specifications the AI agents are trained on.
05
Chapter 5
Documentation & Compliance
The paper trail that keeps you compliant and protects your money: forms, RFIs, claims, submittals, inspections and QC charts.
In this chapter
Spec Obligation Calendar · Forms & Reports
RFIs · Claims & COs · Submittals · Inspections
Asphalt QC/QA · Penalty Tracking
5.1 · Forms & RFIs
Forms & Reports · RFIs
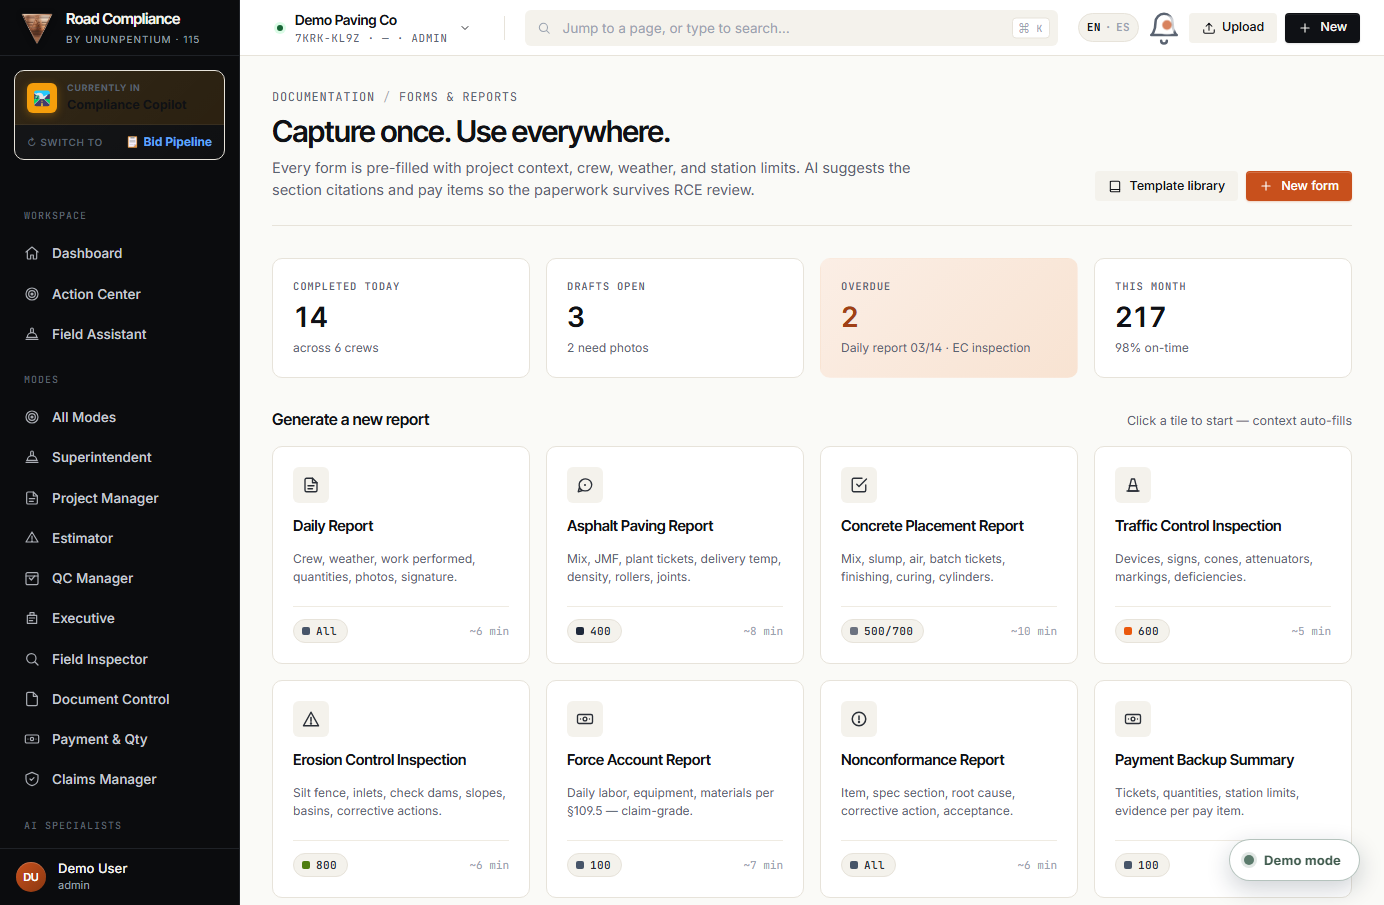
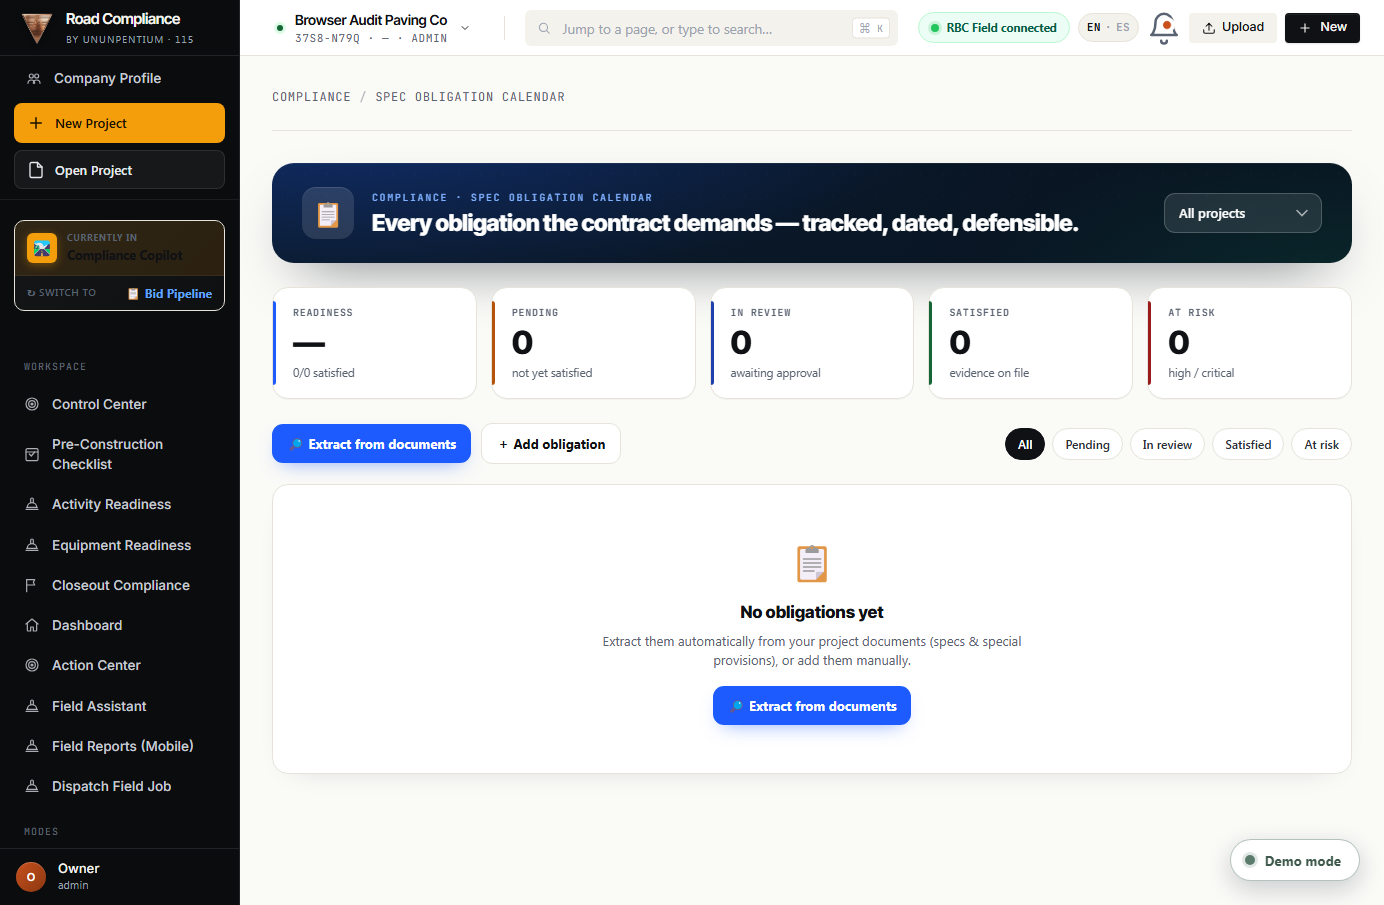
Forms & Reports — standardized agency forms and exportable reports, pre-filled from your data. The Spec Obligation Calendar (same group) tracks deadlines the specs impose, like the 24-hour erosion inspection after rain.
Forms & Reports — generate agency paperwork without retyping.
Spec Obligation Calendar — deadlines the specifications impose, tracked for you.
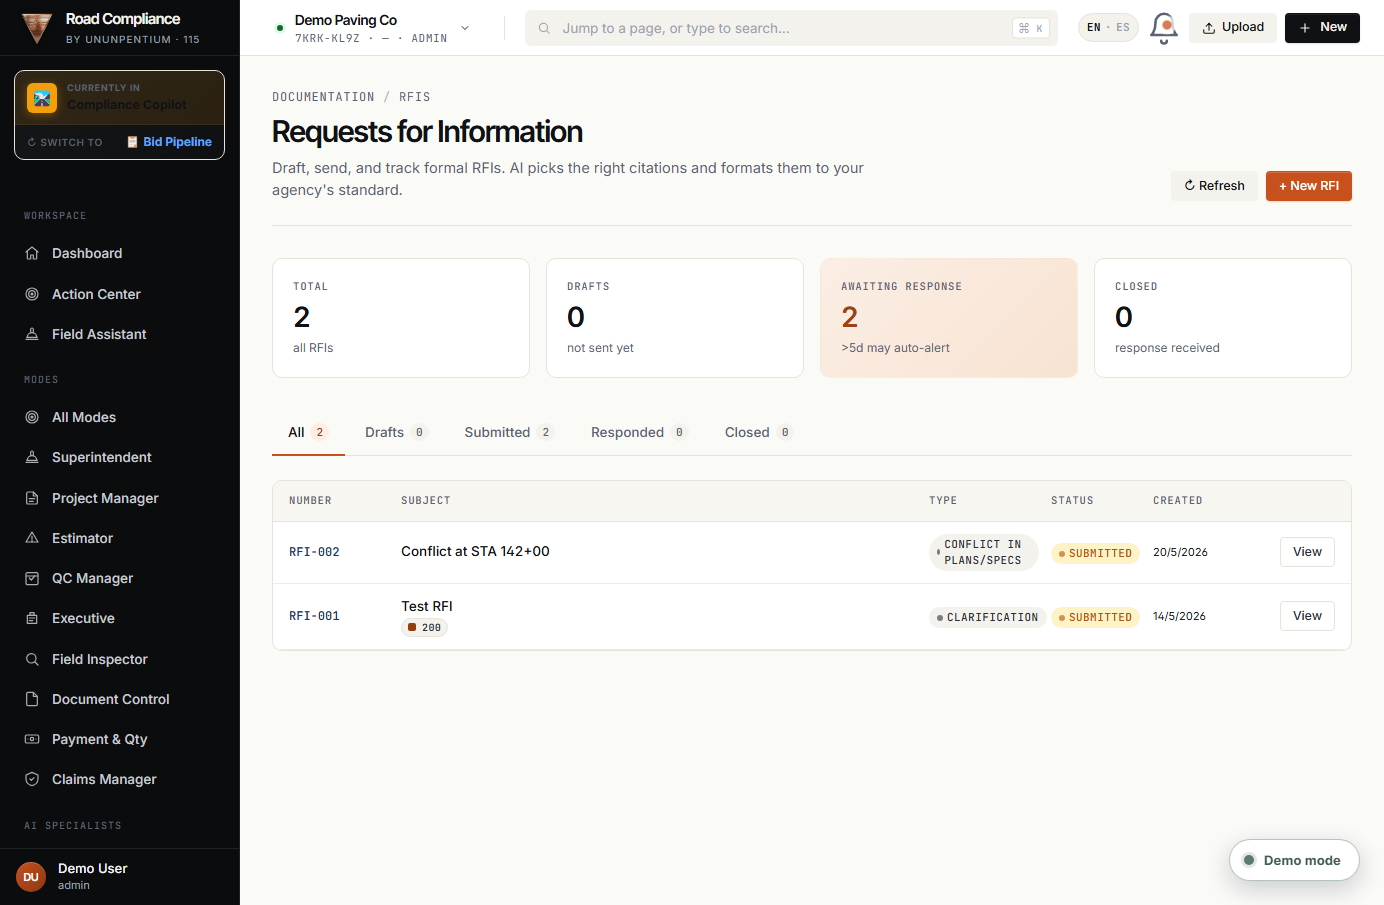
RFIs — log Requests for Information and track them from question to answer so nothing stalls the work.
RFI log — every question and response, tracked.
5.2 · Claims & Submittals
Claims & COs · Submittals
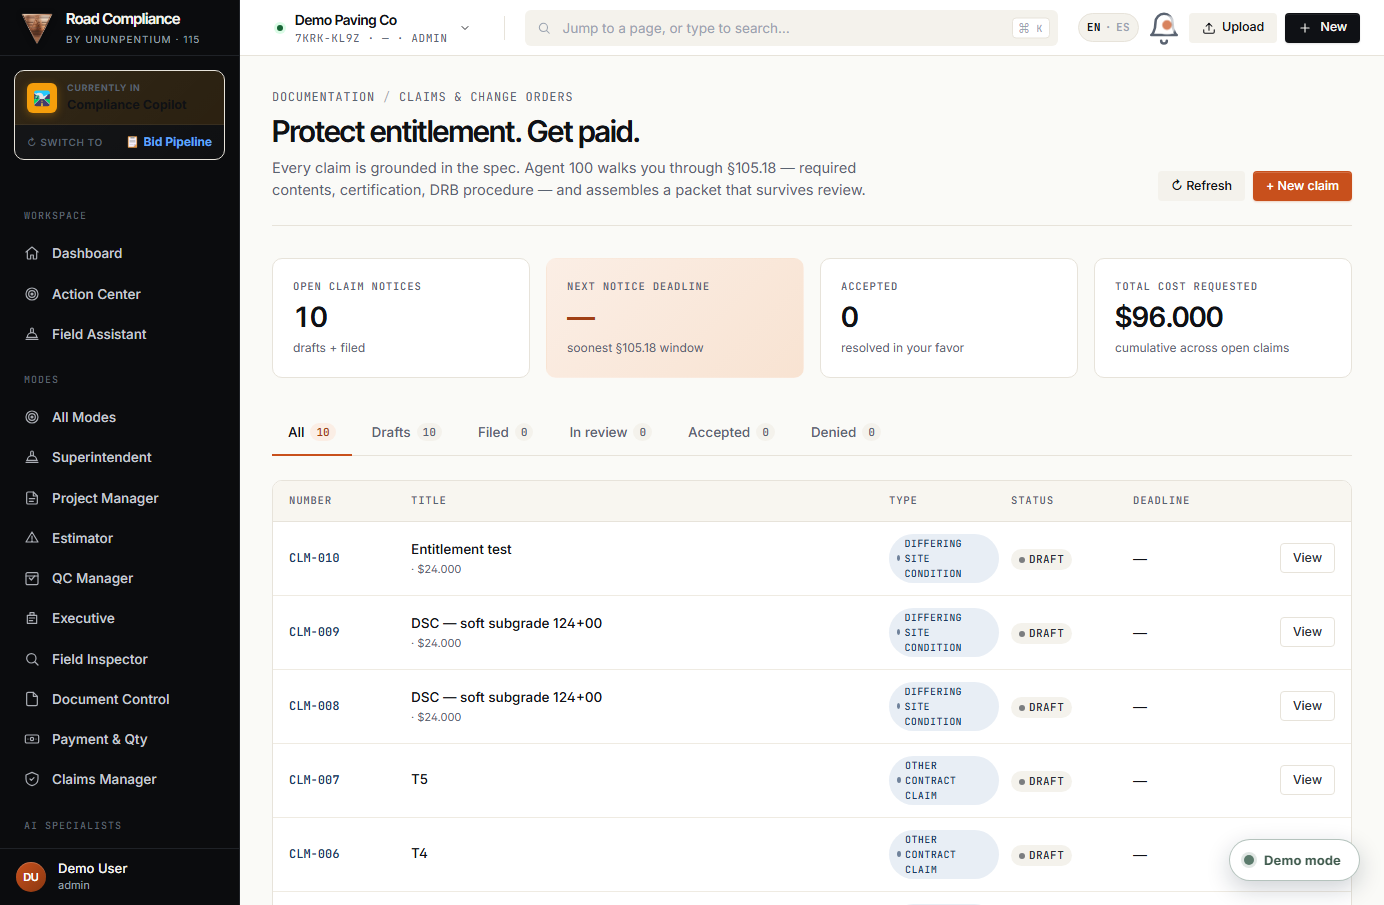
Claims & COs — your register of claims and change orders, backed by the entitlement engine from Chapter 3.
Claims & Change Orders register.
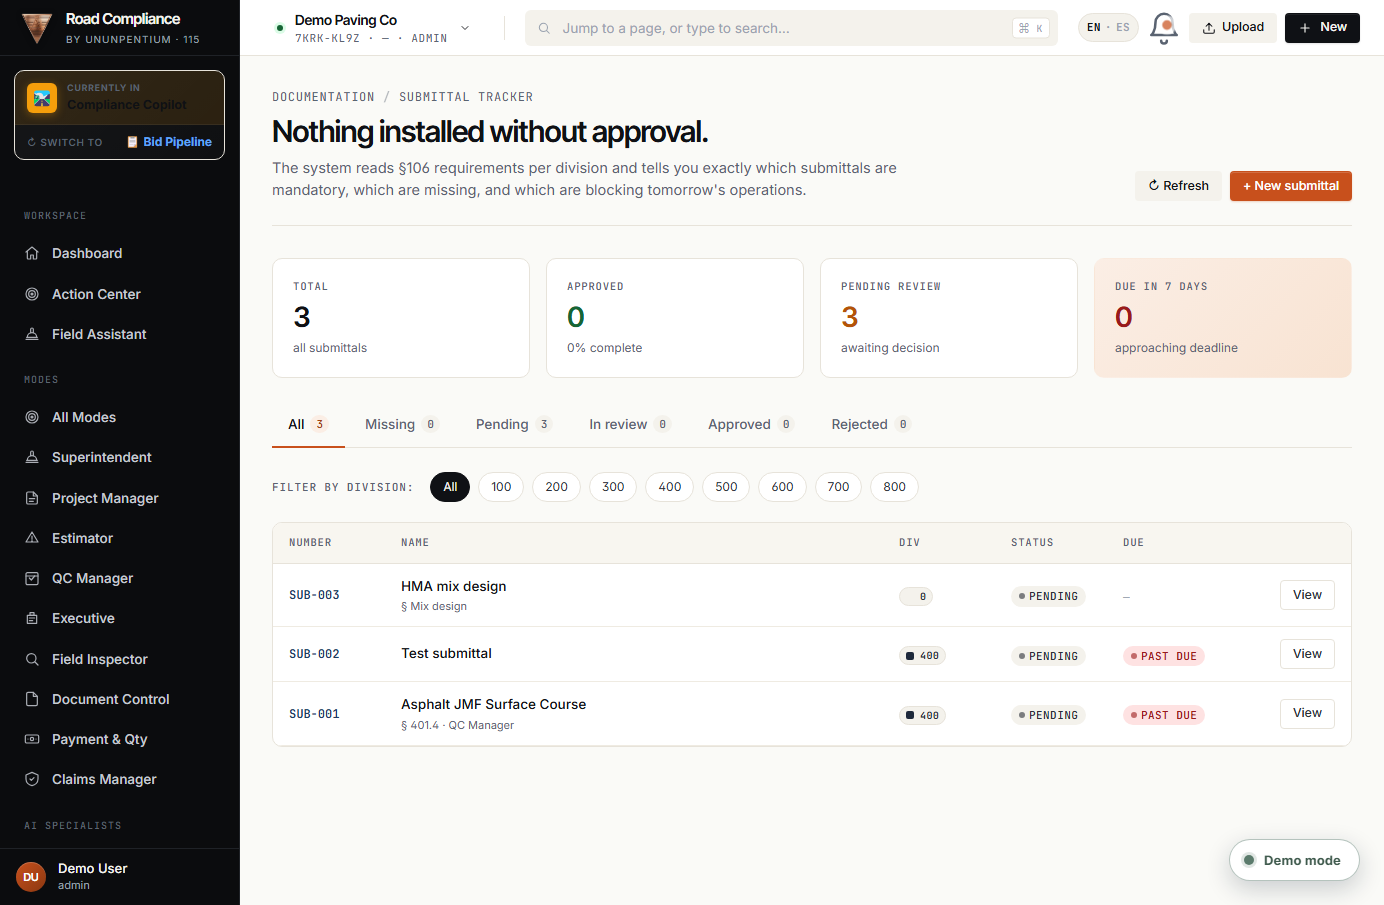
Submittals — track every submittal (mix designs, shop drawings, JMF) through approval, so you never pave on an unapproved mix.
Submittal log with approval status.
⚠️WATCH OUT — A submittal stuck in “pending” can stop tomorrow's work. The Dashboard flags these — clear them early.
5.3 · Inspections & QC
Inspections · Asphalt QC/QA · Penalties
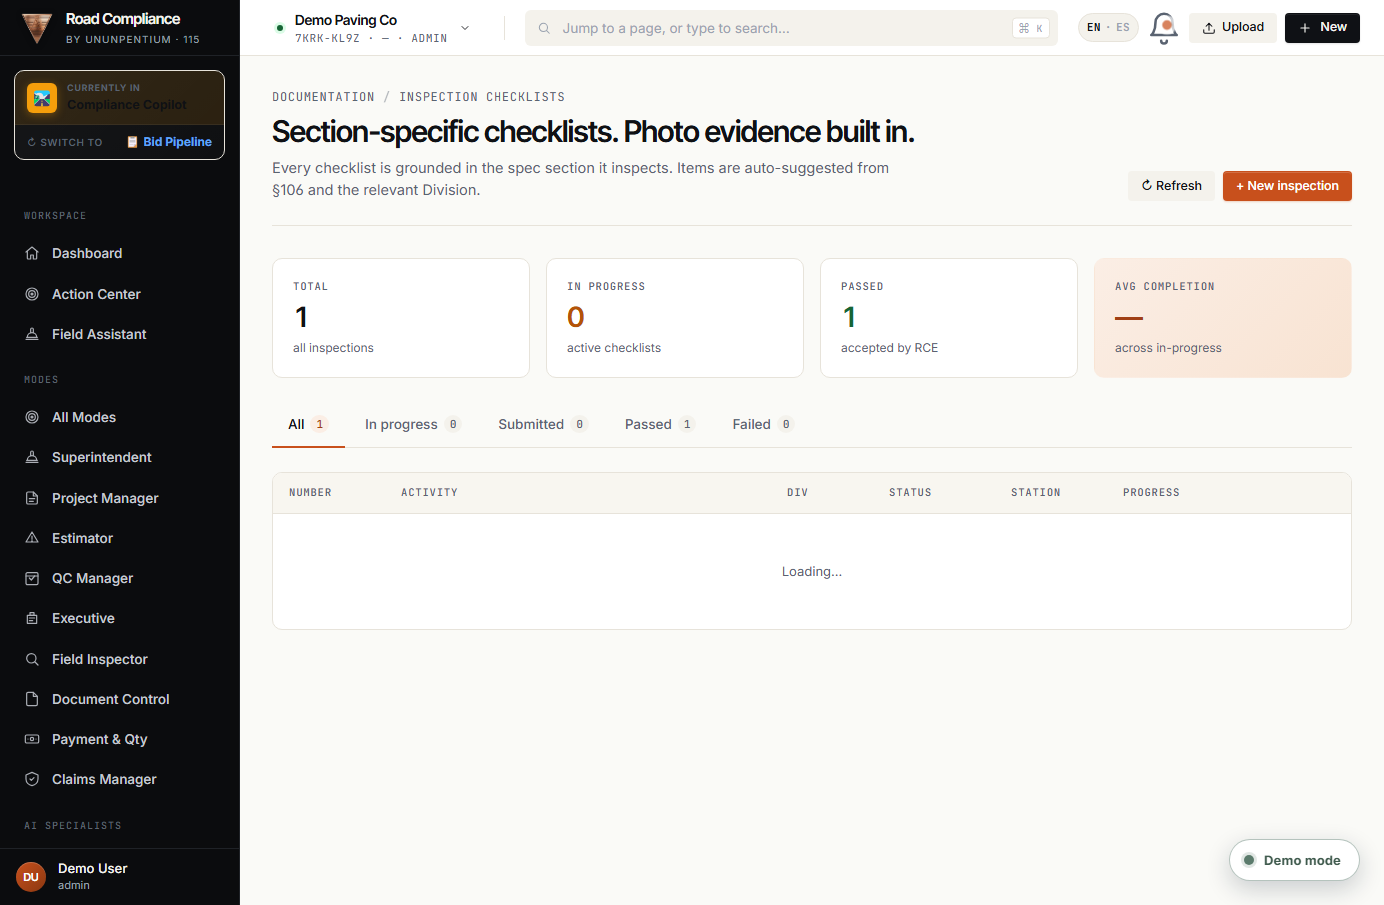
Inspections — record erosion, traffic-control and structural inspections; tie them to events and evidence.
Inspection records, linked to the project event stream.
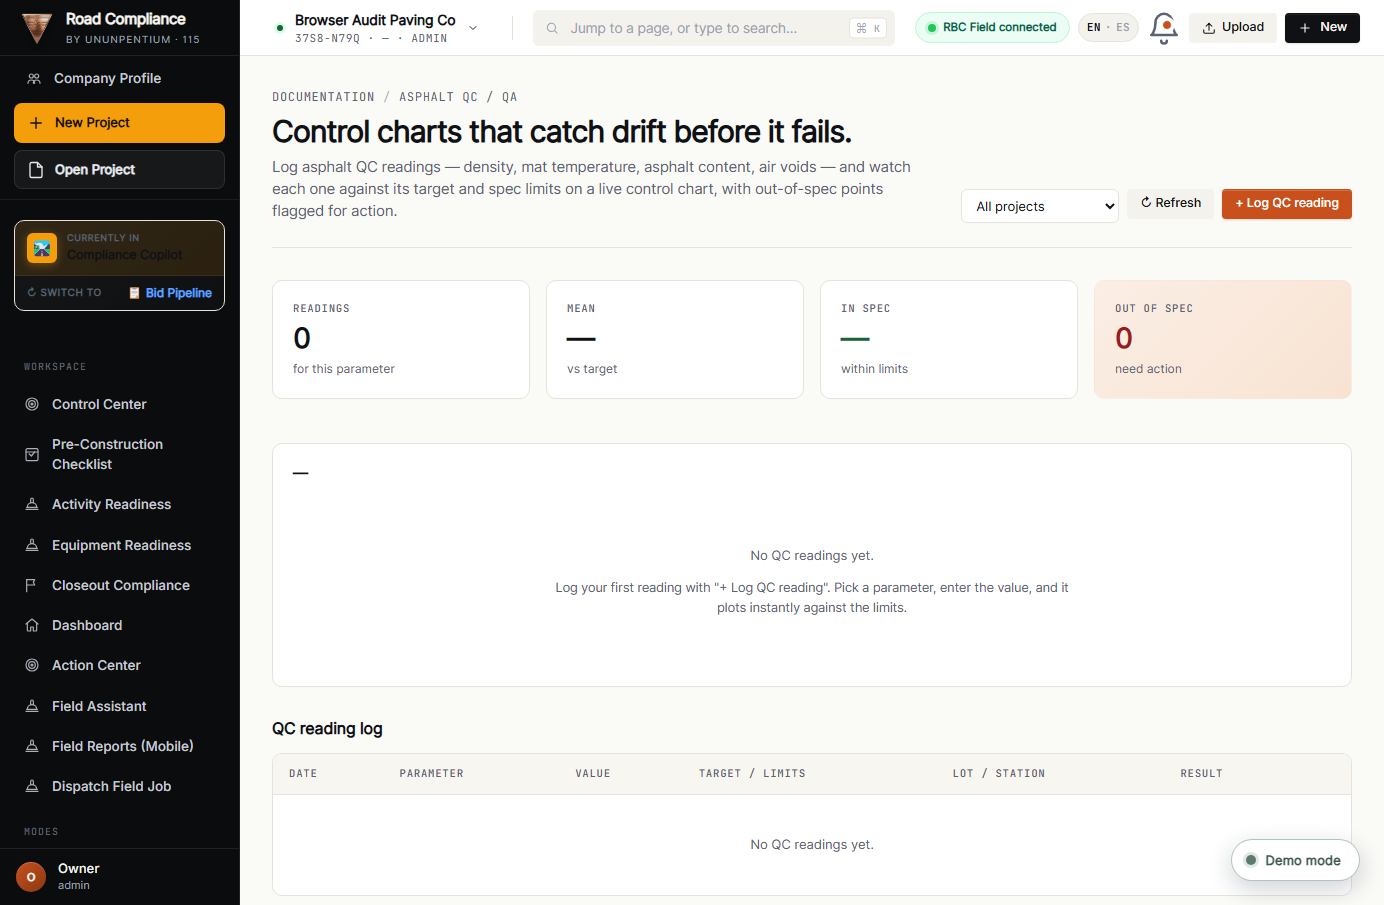
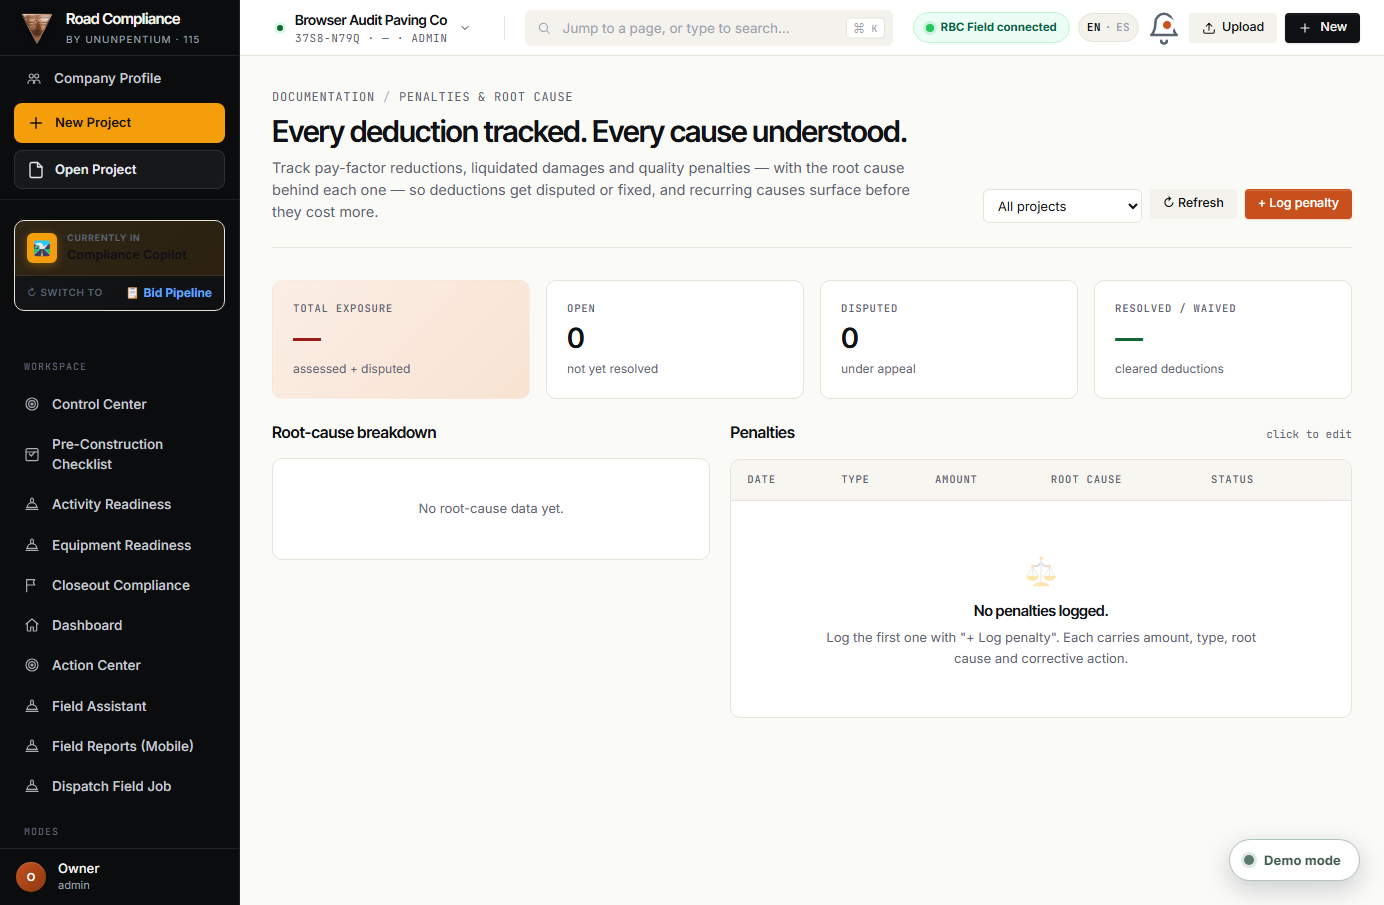
Asphalt QC/QA · Control Charts — statistical quality-control charts for asphalt acceptance. Penalty Tracking keeps an eye on liquidated-damages exposure so surprises don't appear at closeout.
Asphalt QC/QA control charts.
Penalty Tracking.
✅TIP — Use the control charts to spot a trend drifting toward the spec limit before a load gets rejected.
06
Chapter 6
Operations
The day-to-day execution tools — getting paid, controlling traffic, tracking issues, and keeping every photo and document organized.
In this chapter
Payment Backup · Force Account · Production Compliance
Traffic Control · Issue Tracker · Evidence Manager · Documents
6.1 · Payment & Traffic
Payment Backup · Force Account · Traffic Control
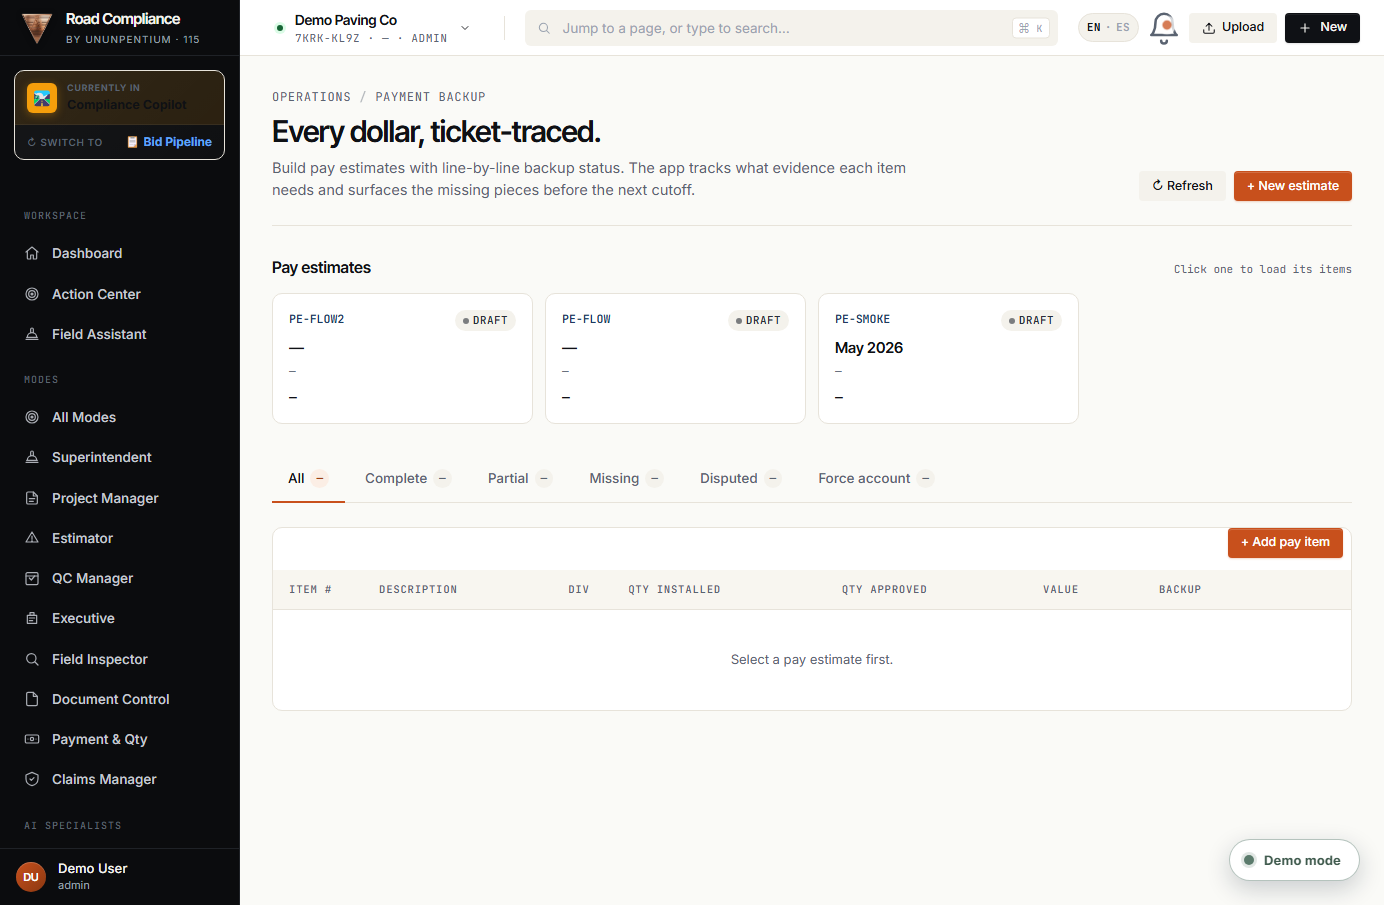
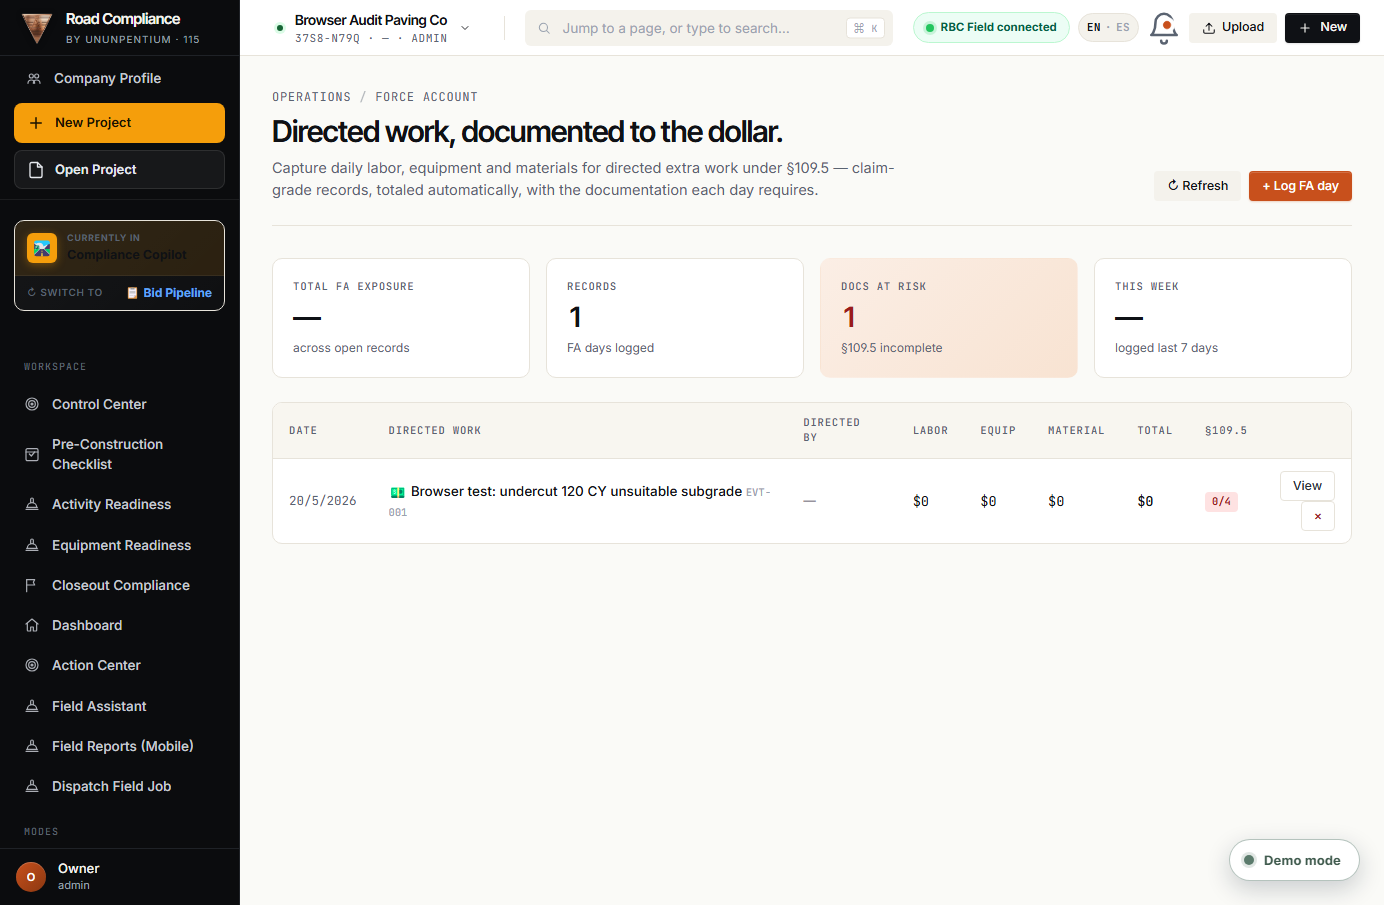
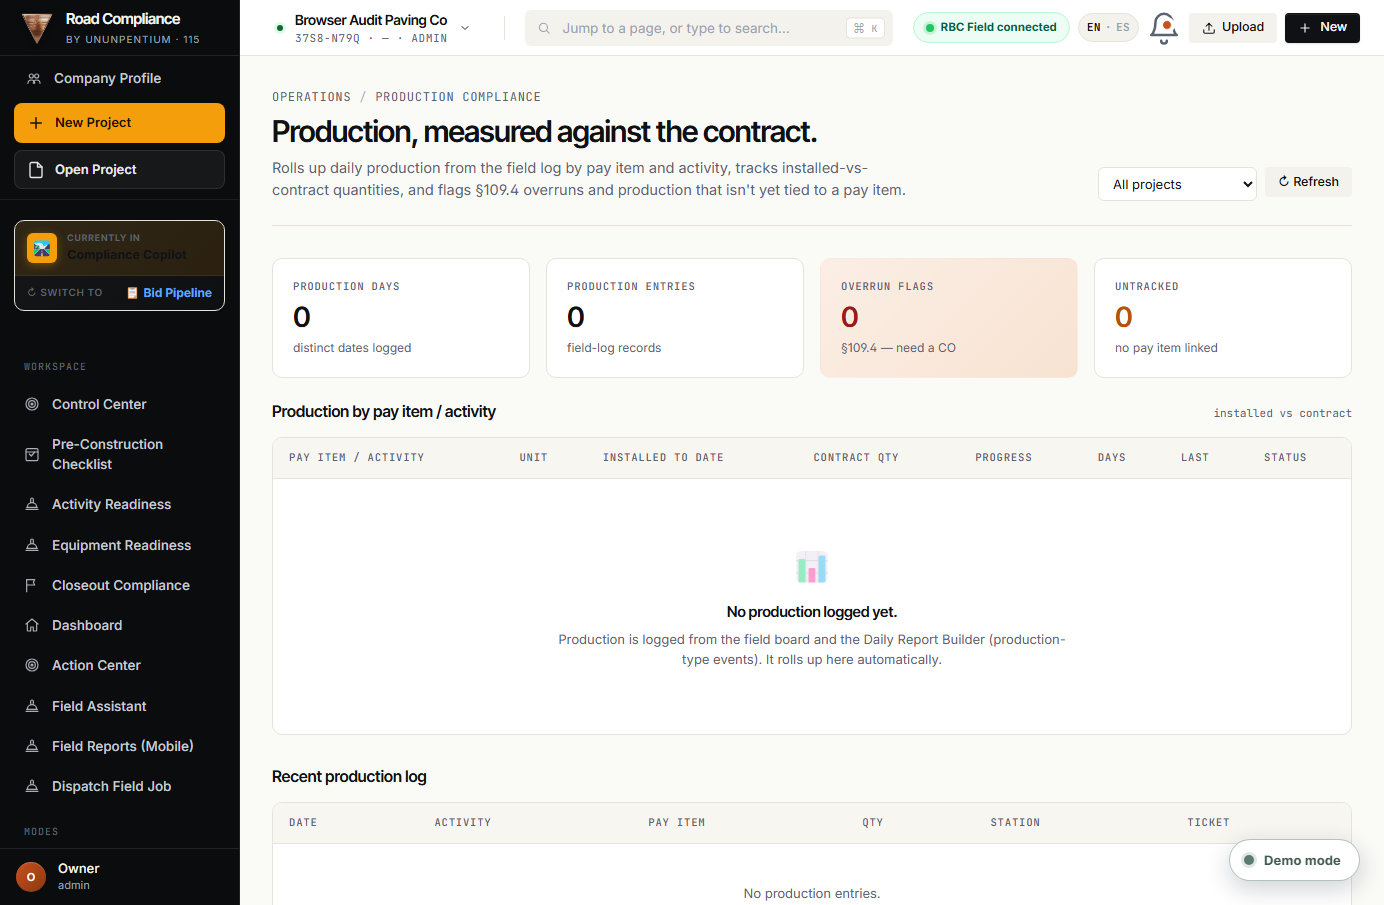
Payment Backup — assemble the documentation behind each pay estimate so the agency pays without disputes. Force Account tracks time-and-materials work; Production Compliance checks output against spec.
Payment Backup — the evidence behind every pay estimate.
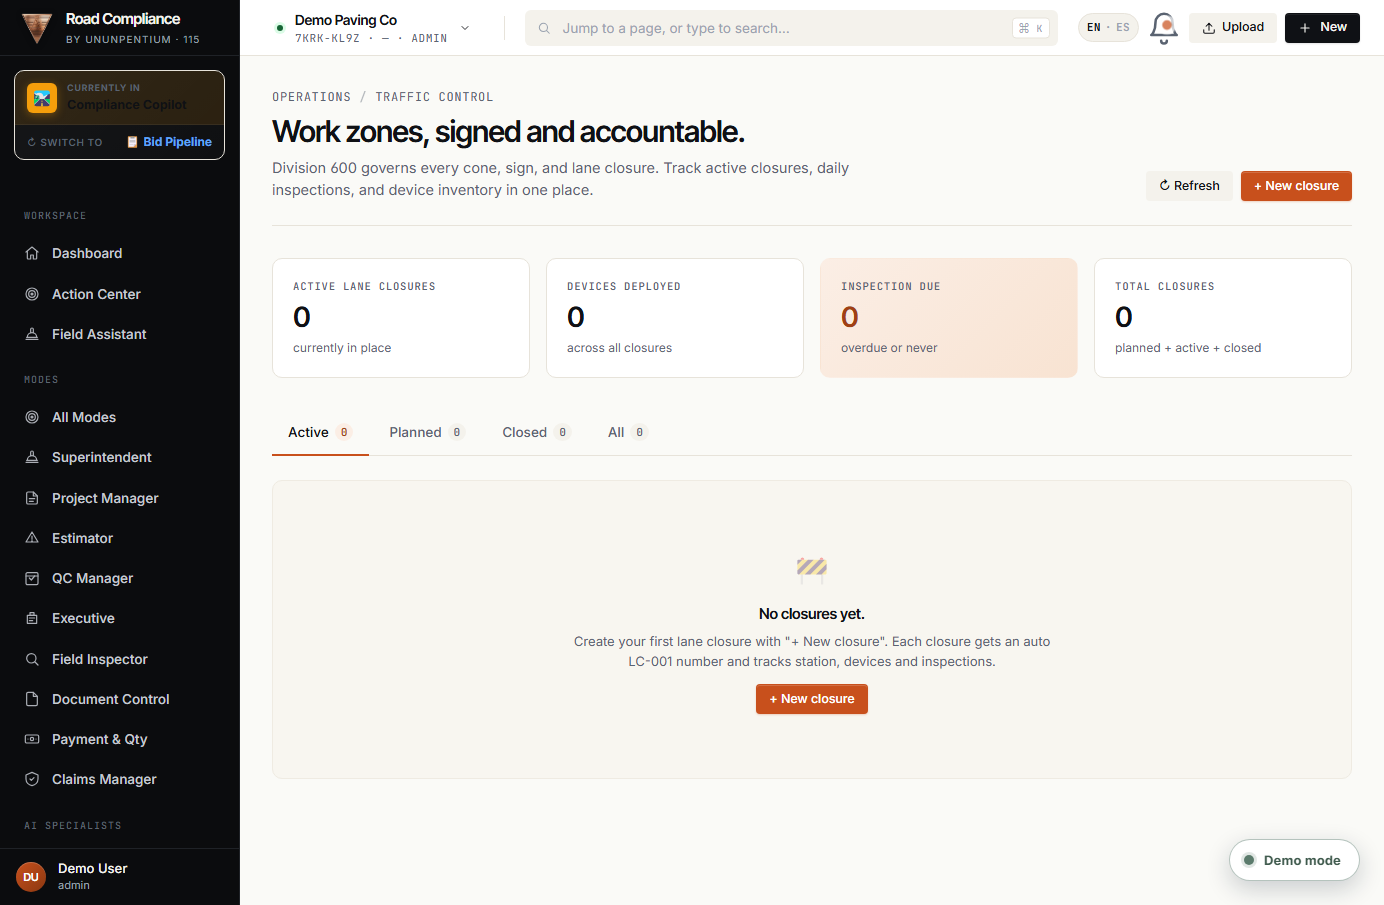
Traffic Control — manage lane closures and work-zone devices, including the daily inspections the spec requires.
Traffic Control — lane closures and work-zone device tracking.
Force Account — time-and-materials tracking.
Production Compliance.
6.2 · Issues, Evidence & Documents
Issue Tracker · Evidence Manager · Documents
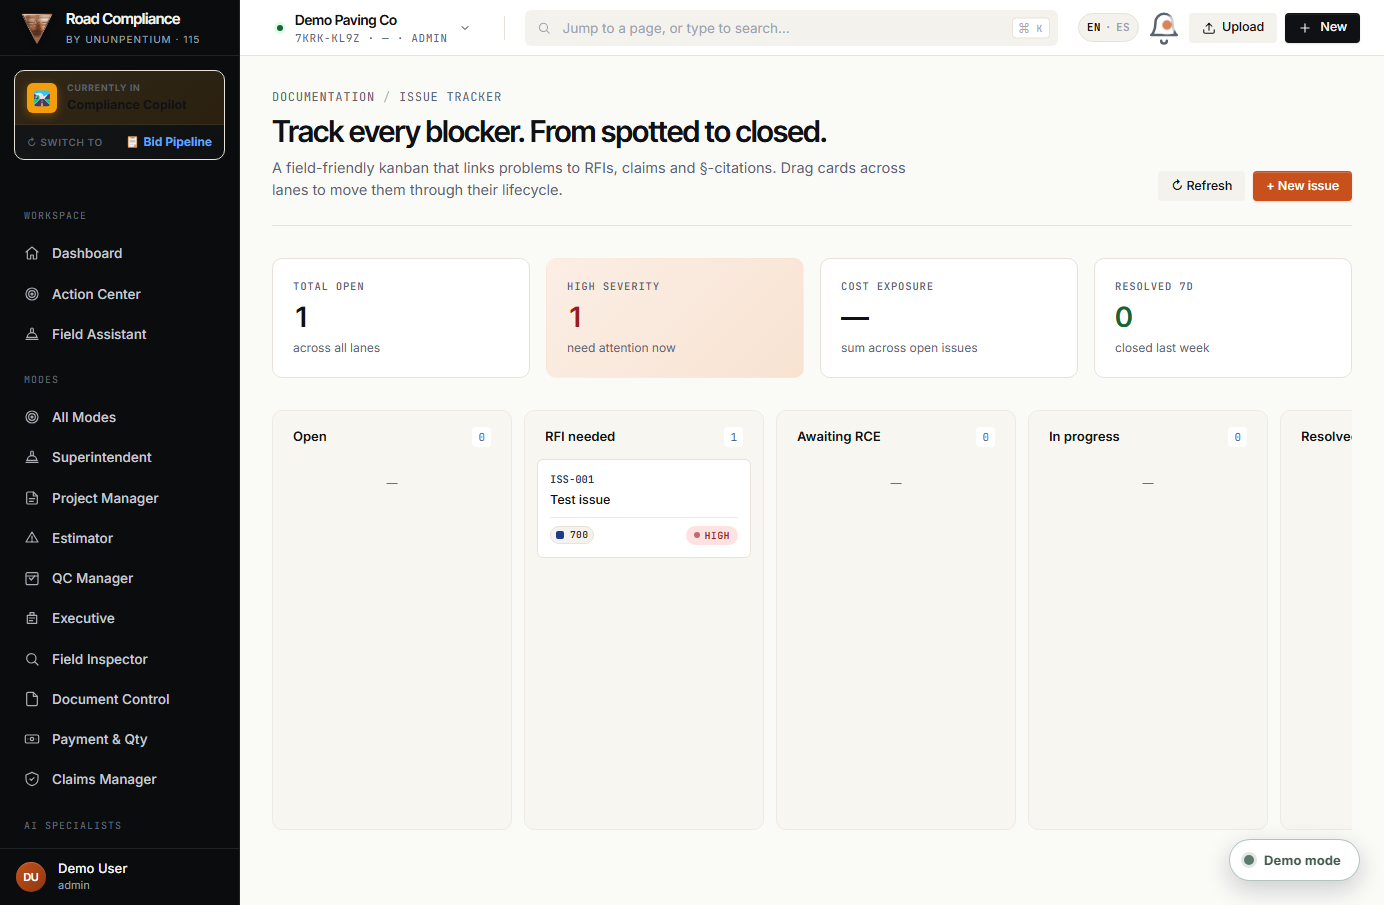
Issue Tracker — a running list of open problems and who owns them.
Issue Tracker — open problems and owners.
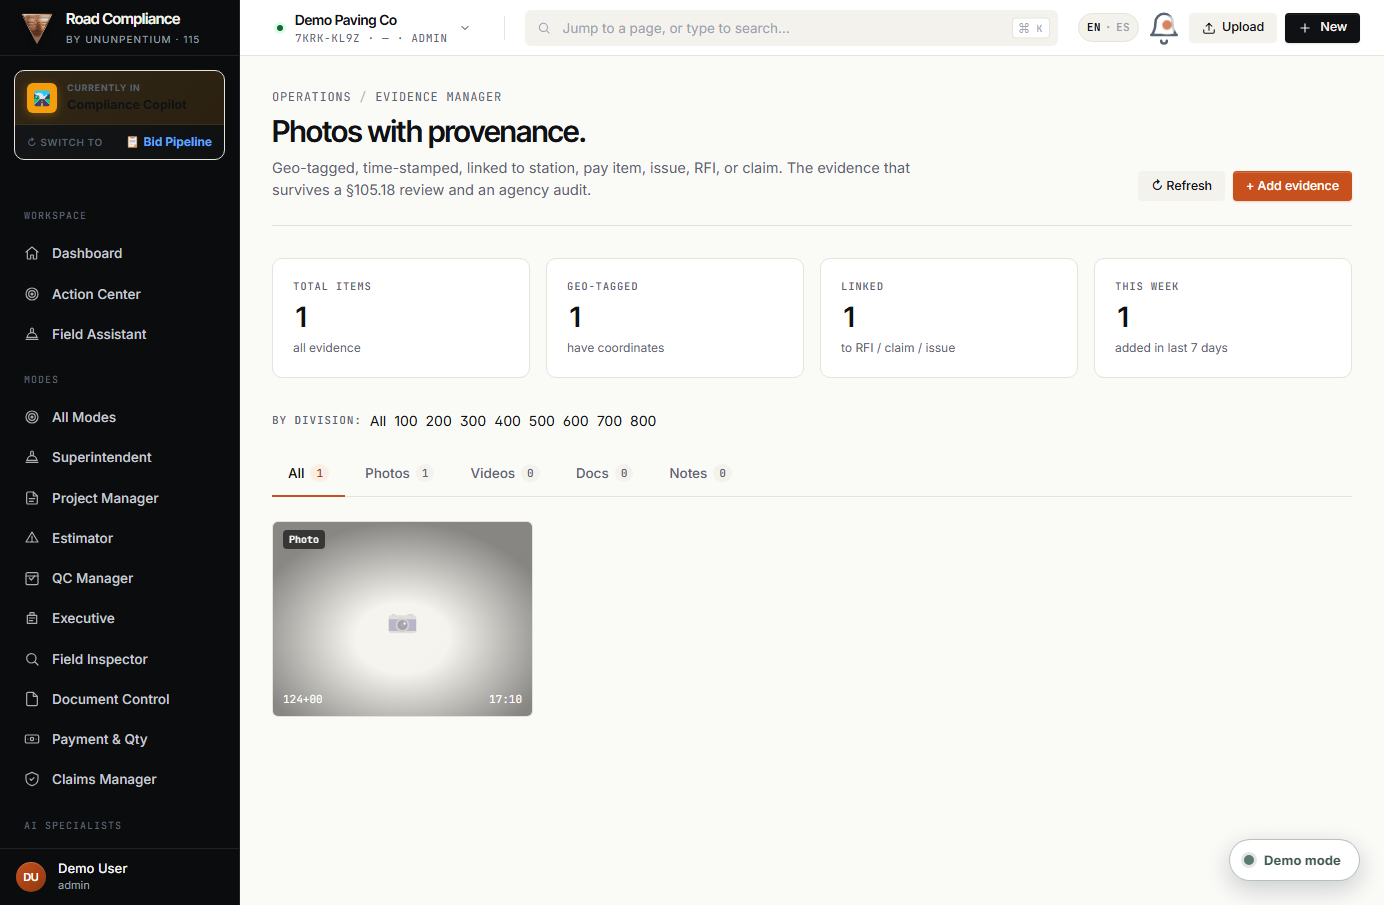
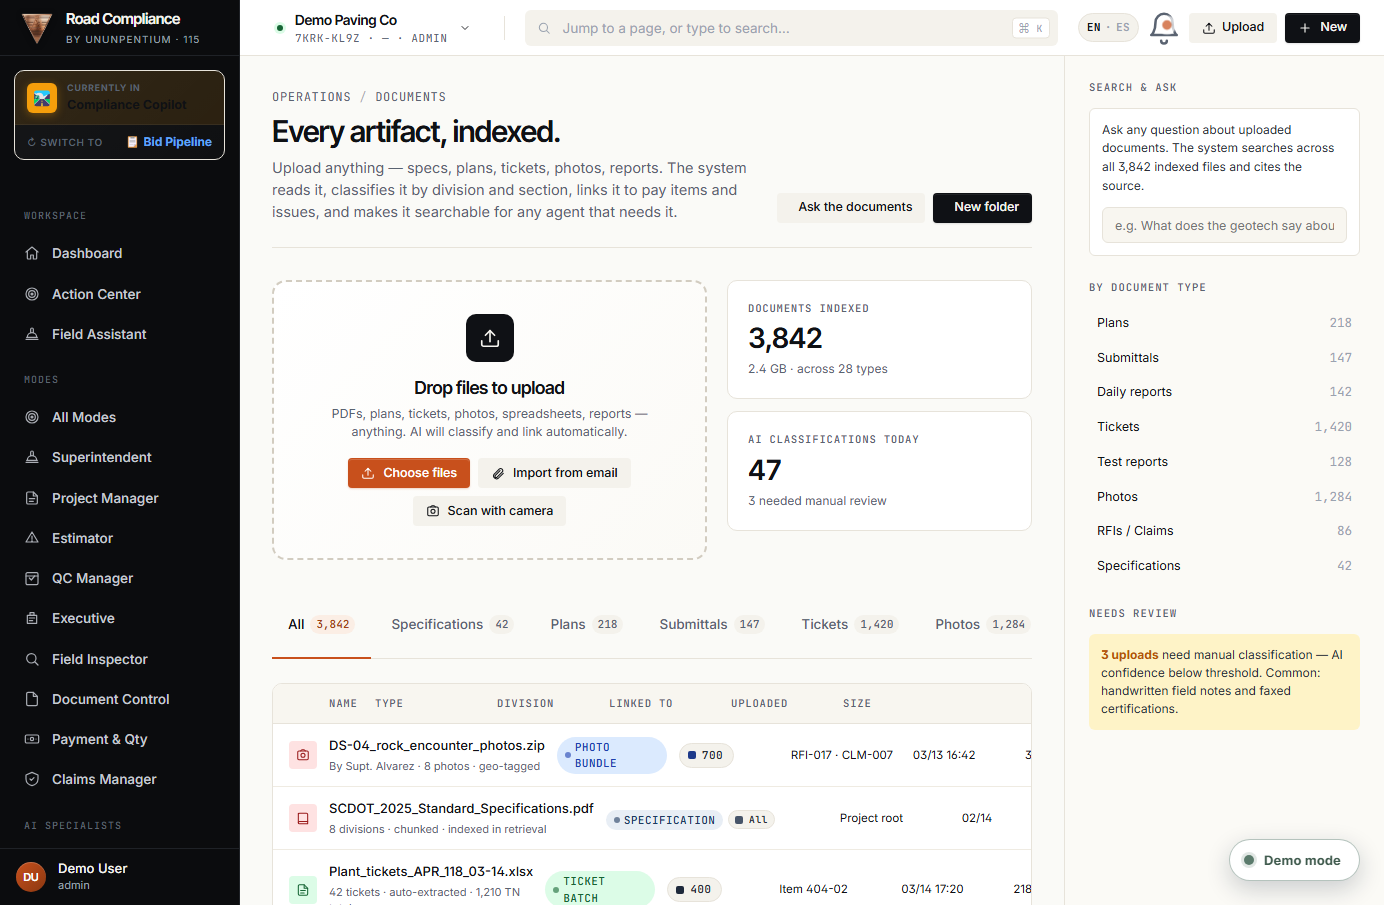
Evidence Manager — your photo/document evidence vault, the backbone of any claim. Documents stores plans and project files.
Evidence Manager.
Documents.
⭐PRO MOVE — Every photo in Evidence Manager is dated. When a dispute arises months later, your timestamped vault is what wins it.
07
Chapter 7
Insight & Reporting
Step back and see the bigger picture — weekly reviews, your history with the agency, executive reports, alerts and a full audit trail.
In this chapter
Weekly Ops Review · Agency History · Exec Reports
Notifications · Audit Log
7.1 · Reviews & reports
Weekly Ops Review · Agency History · Exec Reports
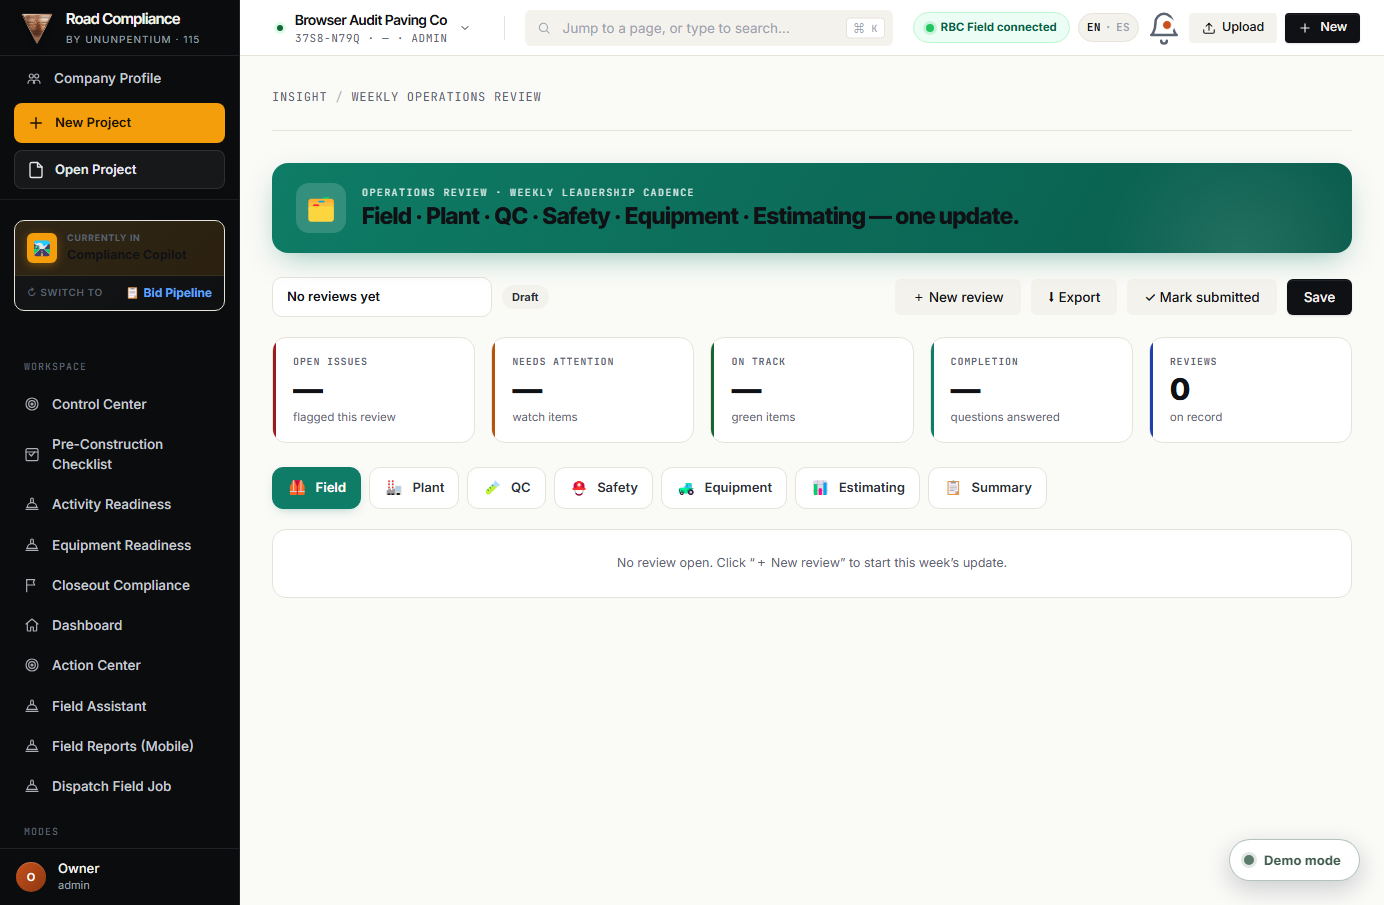
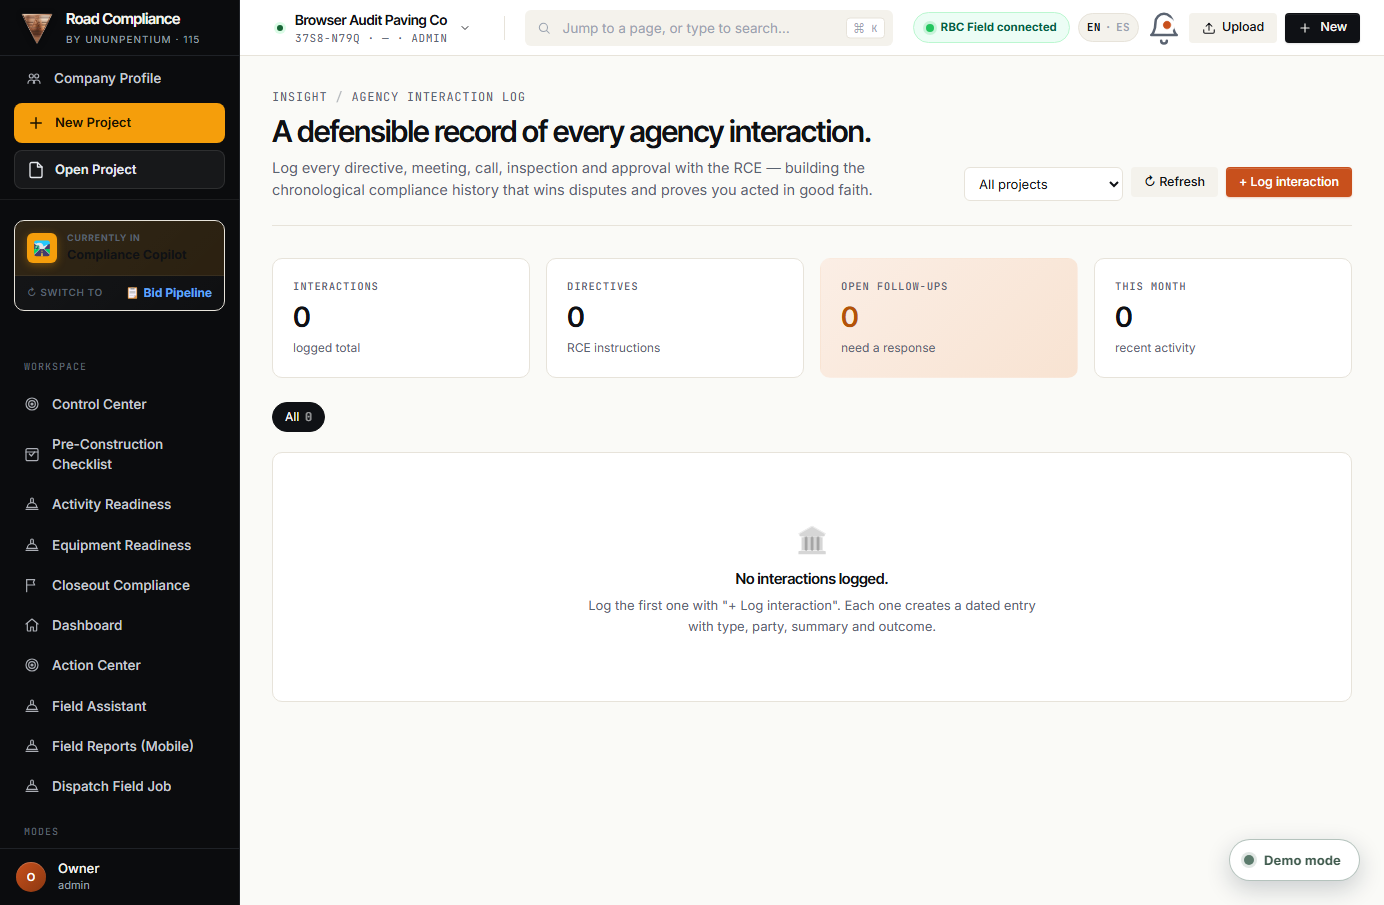
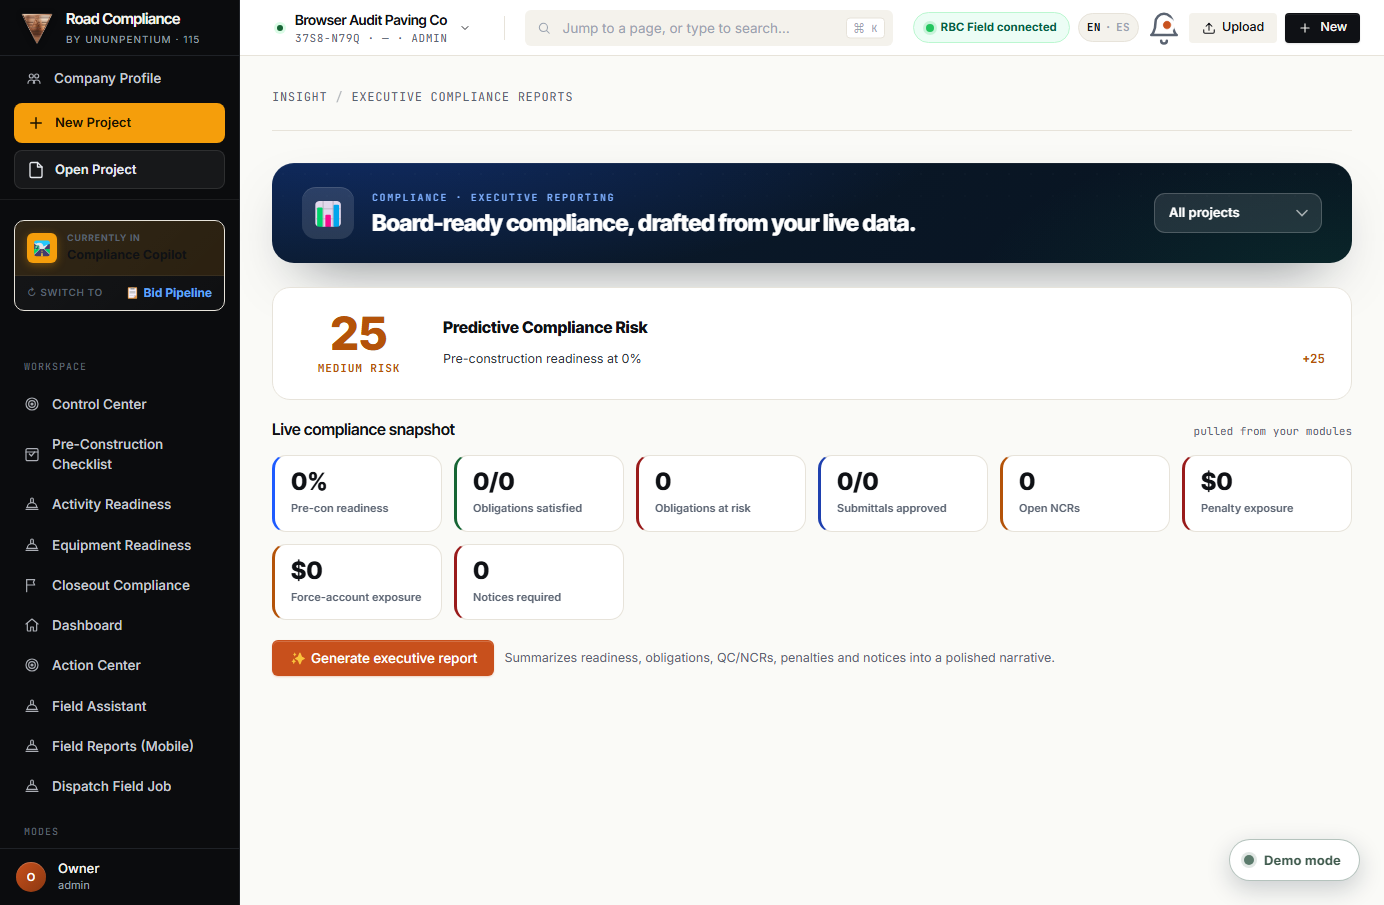
Weekly Ops Review — a structured weekly check on every project. Agency History keeps your track record with the agency. Exec Compliance Reports turn all of it into a board-ready summary you can export.
Weekly Ops Review — a structured weekly check across projects.
Agency History.
Exec Compliance Reports.
ℹ️GOOD TO KNOW — Every Mode also exports its own consistent, KPI-headed report, so any role can hand off a clean summary.
7.2 · Notifications & Audit
Notifications · Audit Log
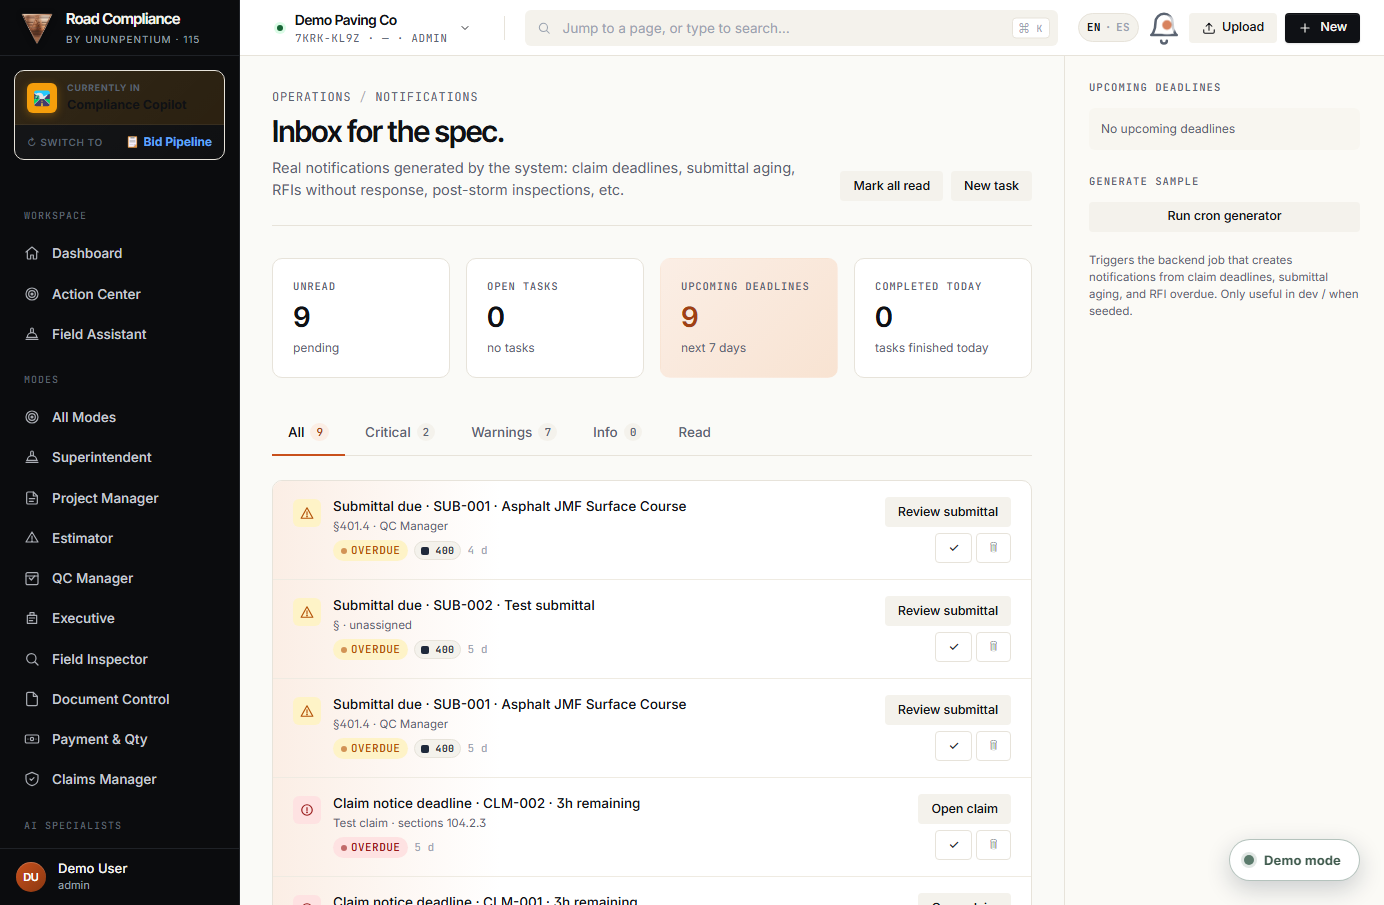
Notifications — your alert feed: new field reports, approaching deadlines, items needing review.
Notifications — everything that needs your attention, in one feed.
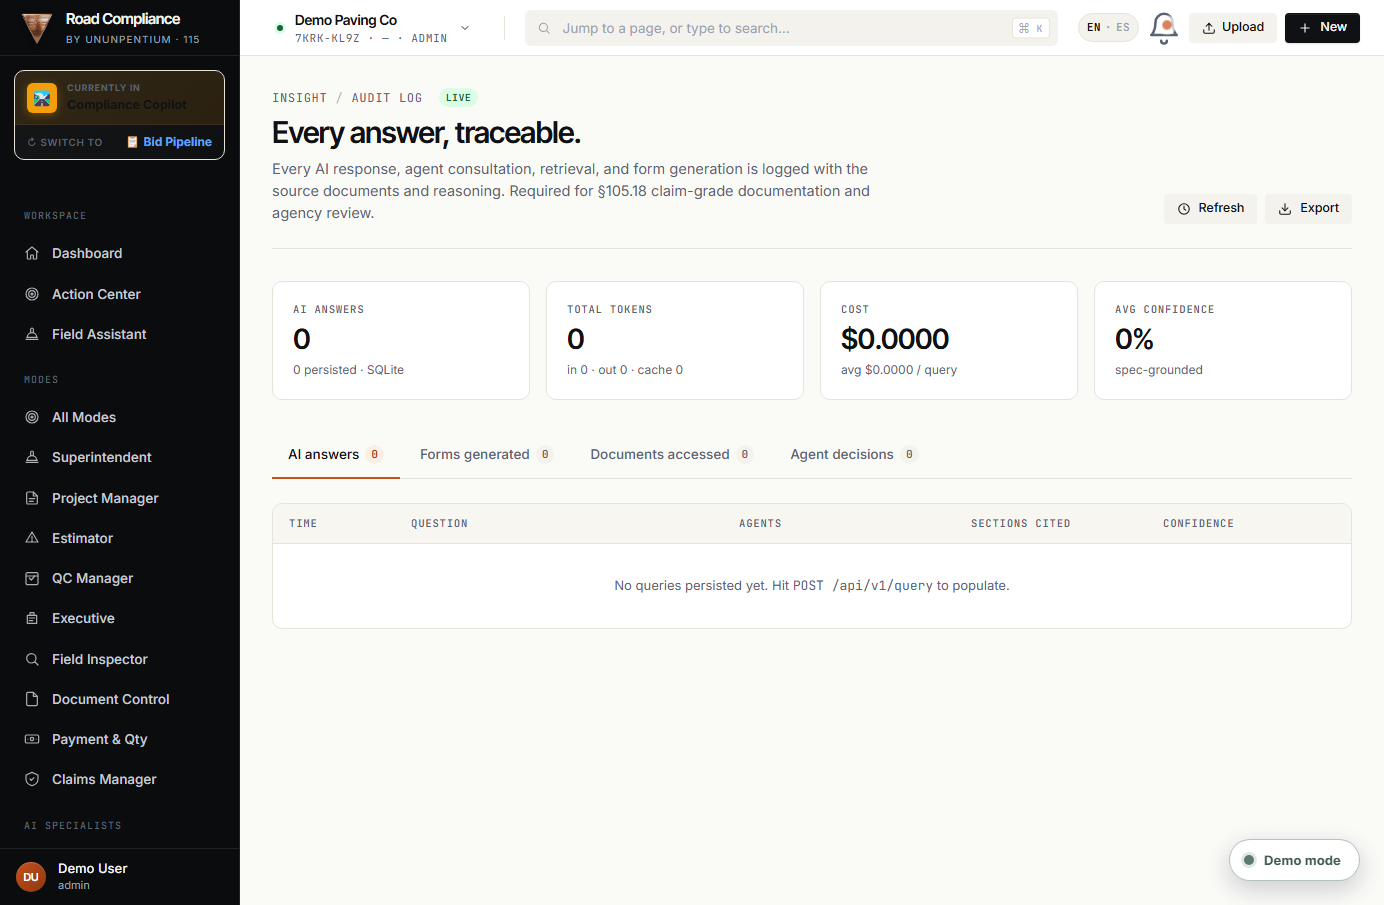
Audit Log — a complete, time-stamped record of who did what. Essential for disputes and for proving compliance.
Audit Log — the immutable “who did what, when”.
08
Chapter 8
The Bid Pipeline
Flip the sidebar switch to Bid Pipeline to win the right work — priced right and fully compliant — before you ever submit.
In this chapter
Bid Hub · New Bid Wizard · 29-section Intake
Bid Risk Review · Orchestrator & agents · Run history
8.1 · Bid Hub & Wizard
Bid Hub & the New Bid Wizard
Switch to Bid Pipeline → Bid Hub
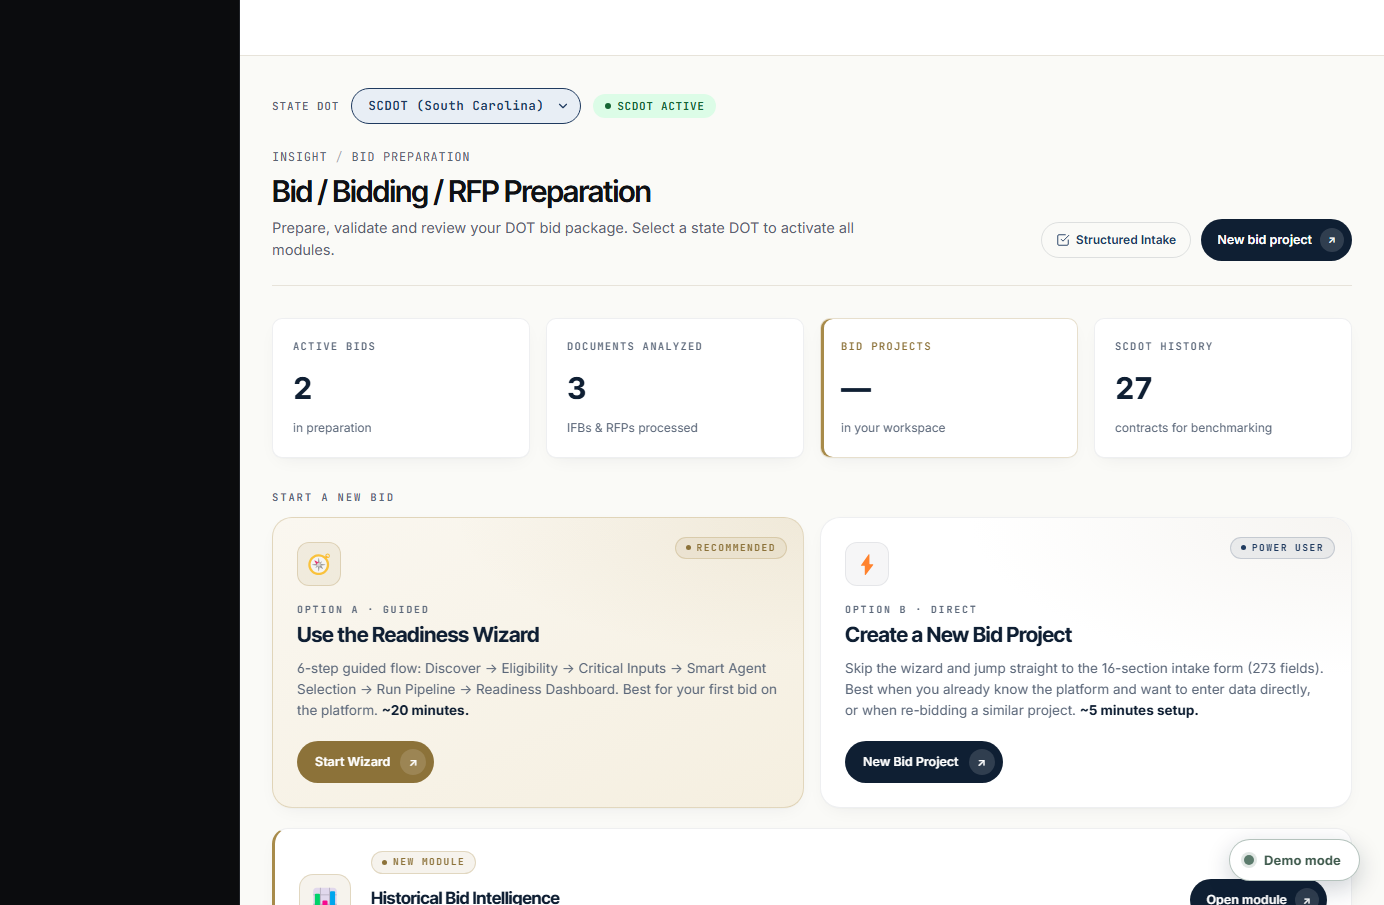
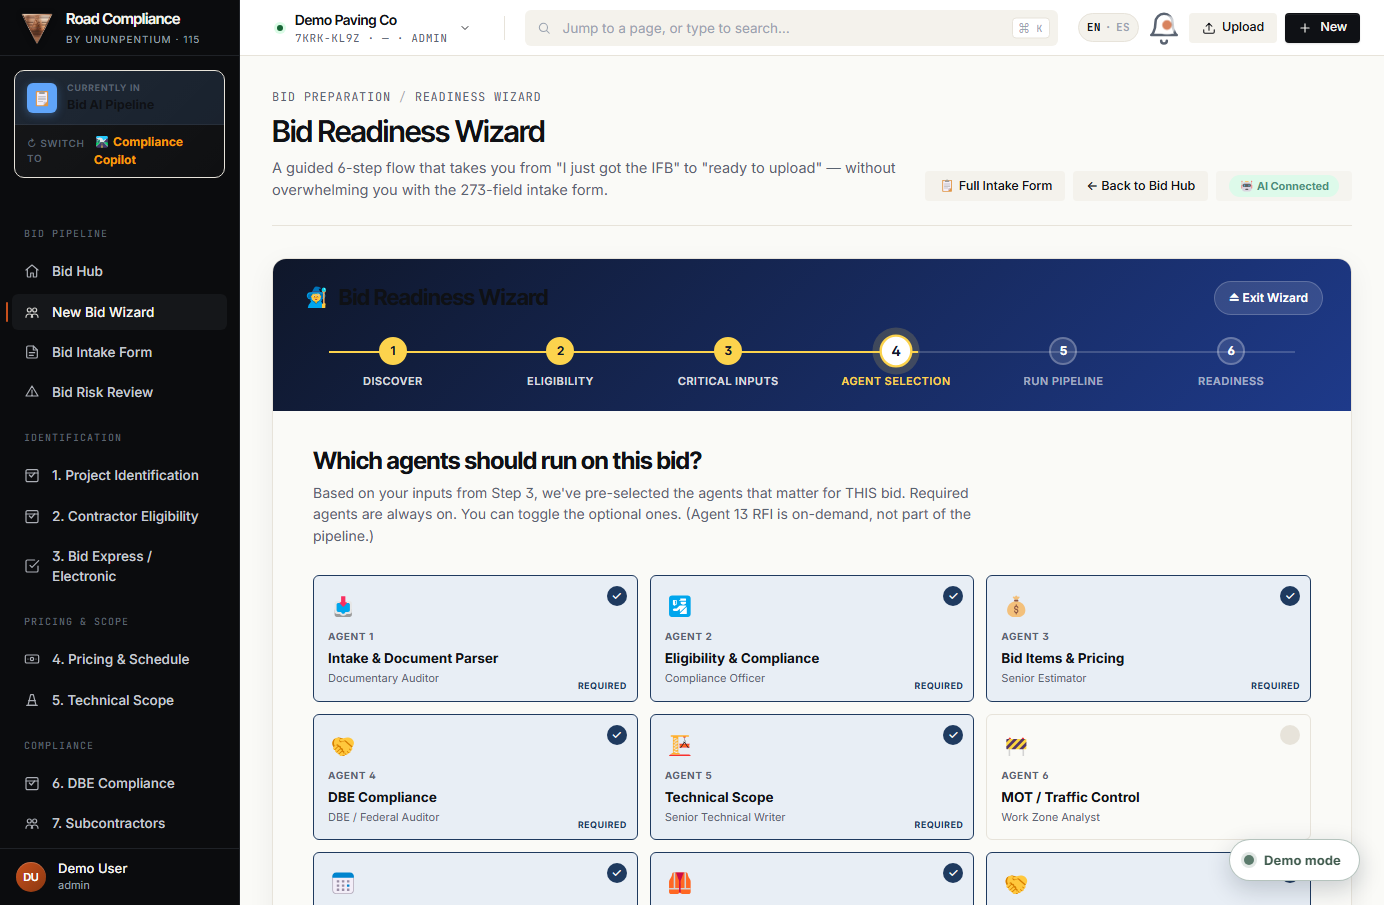
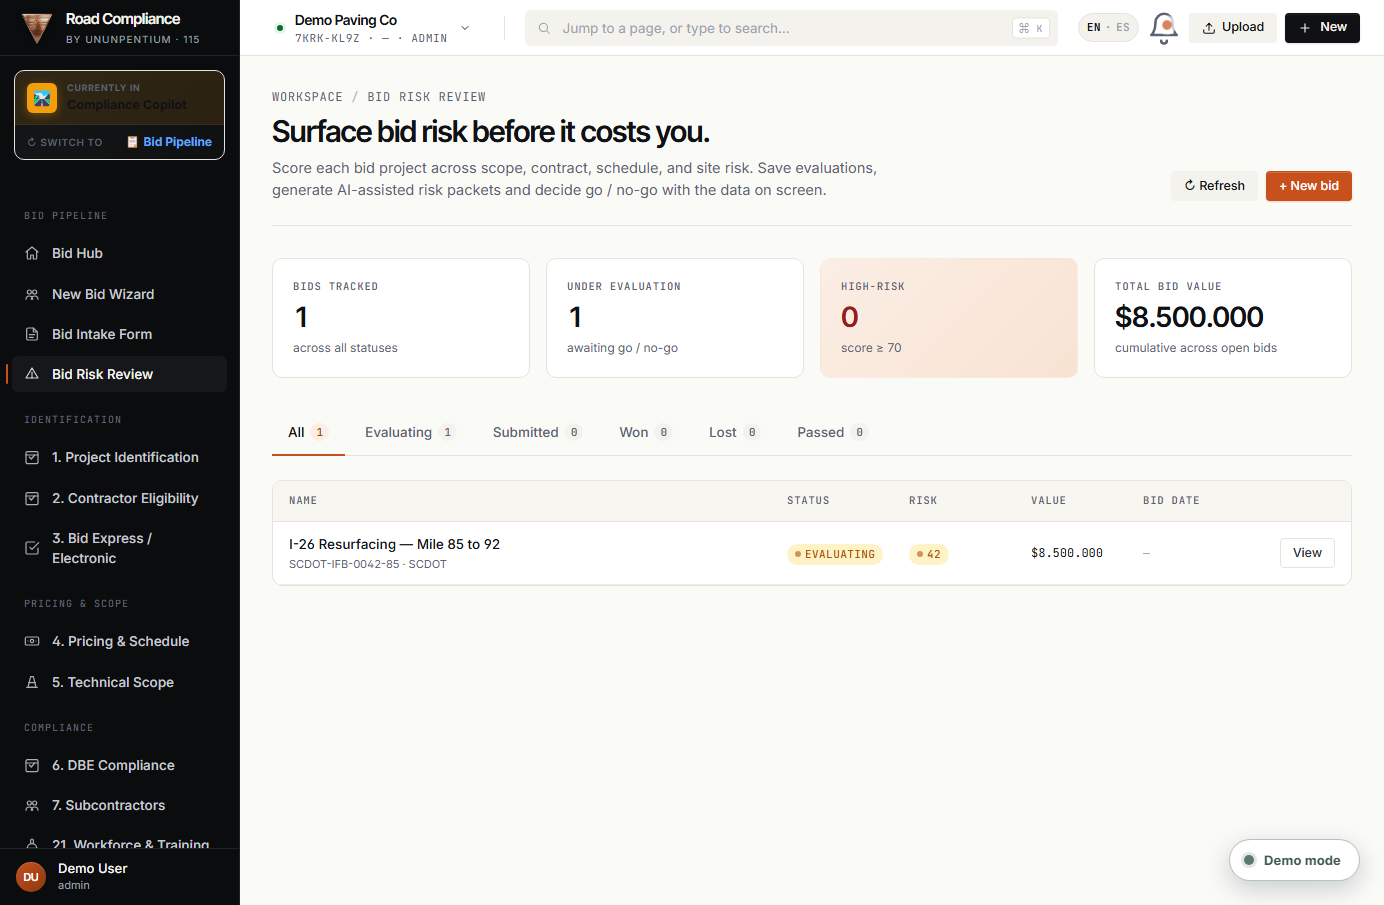
Bid Hub shows every bid in flight. The New Bid Wizard walks you through a new bid in six guided steps — Discover, Eligibility, Inputs, Agents, Pipeline, Readiness — so nothing is missed.
The Bid Hub — all your bids in one place.
Switch to Bid Pipeline and open the Bid Hub.
Click New Bid Wizard and follow the six steps.
The wizard pulls your Company Profile in automatically, so eligibility is half-done.
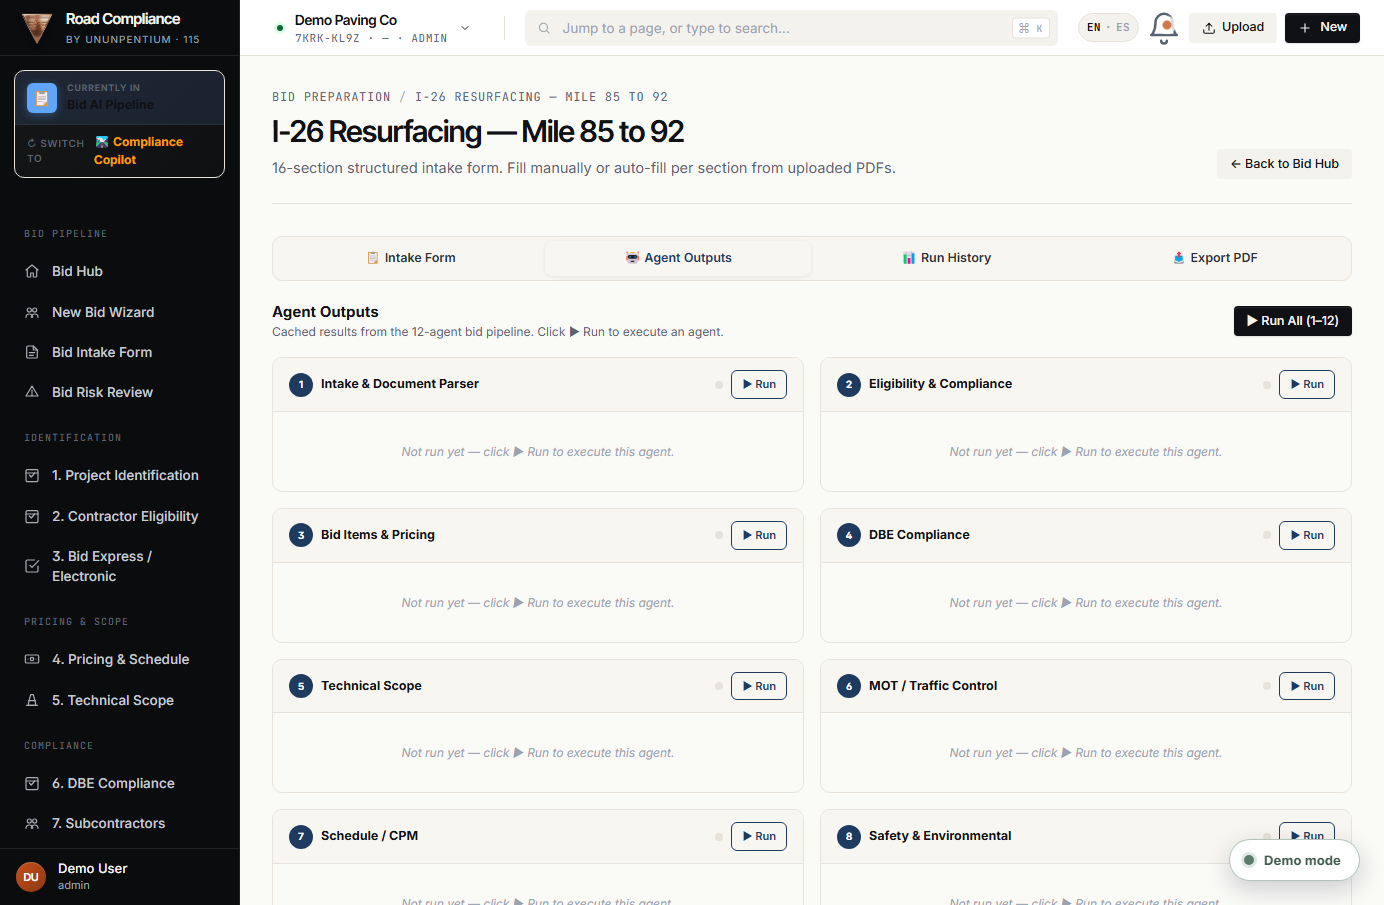
Wizard step 4 — the AI agents review your bid for risk.
8.2 · Bid Intake
The 29-section Bid Intake Form
Bid Pipeline → Bid Intake Form
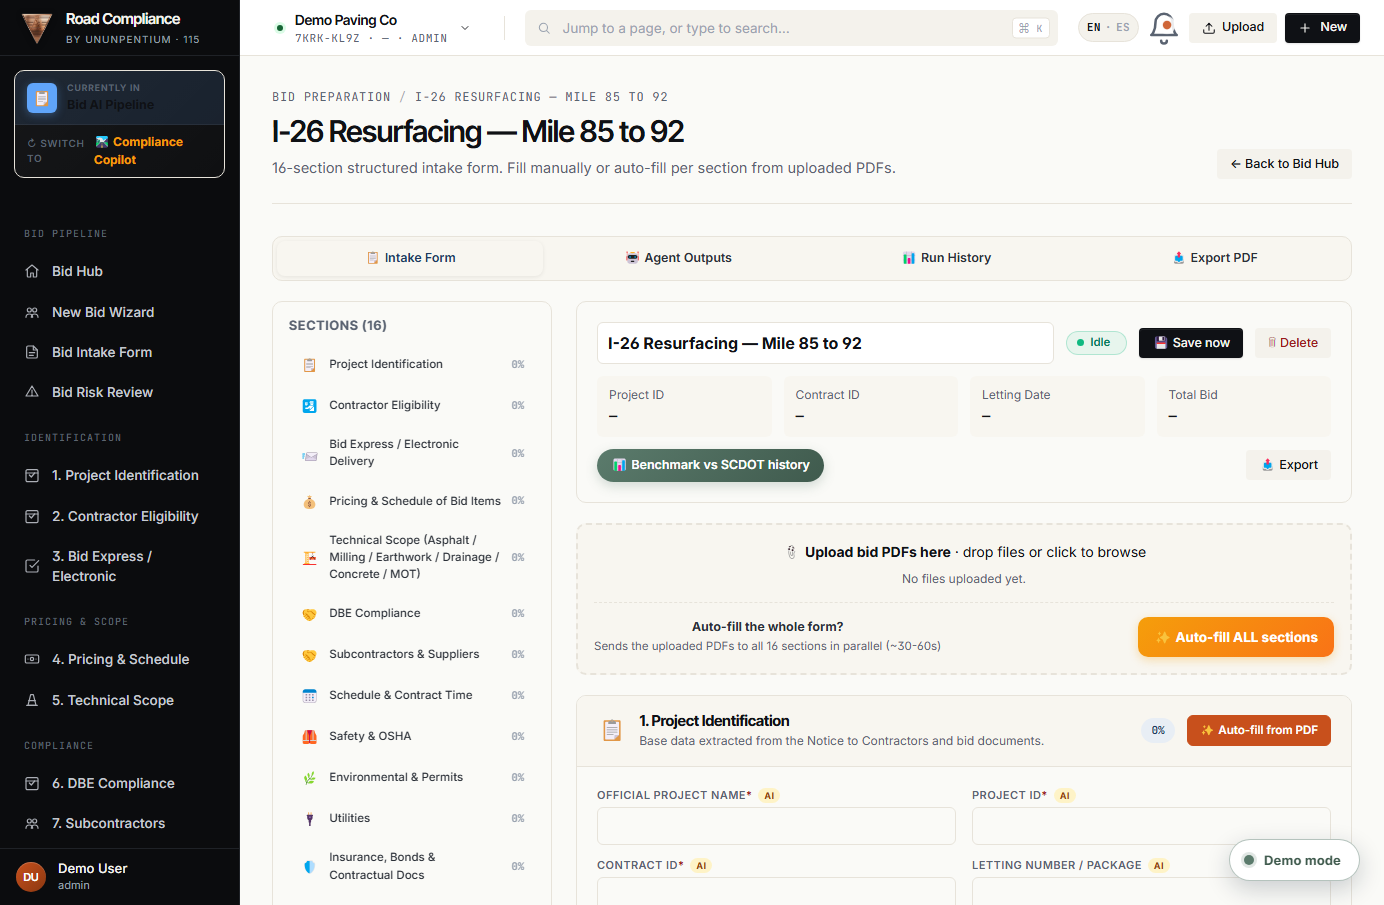
What it is: the master checklist for a compliant bid — 29 sections covering everything from Project Identification and DBE to Traffic Plan, Bonds, Erosion Control and Red Flags. You can upload the SCDOT bid PDF and the platform auto-fills it for you.
The 29-section intake — the sidebar jumps you to any section.
Open the Bid Intake Form.
Upload the agency's bid/solicitation PDF — the platform parses it and pre-fills fields, items and dates.
Review each of the 29 sections (use the sidebar to jump) and fill any gaps.
⭐PRO MOVE — Always start by uploading the PDF. It can fill a large part of the form in seconds, then you just verify.
8.3 · Risk & AI
Bid Risk Review & the Orchestrator
Bid Pipeline → Bid Risk Review
What it is: the Bid Orchestrator coordinates all the division agents to review your bid and surface red flags and risks before you submit — so you don't discover a problem after award.
Bid Risk Review — the AI flags risk before you commit.
Each specialist returns concrete findings you can act on.
⚠️WATCH OUT — Don't skip the risk review to save time. A single missed red flag (a tricky utility relocation, an aggressive schedule) can erase the whole job's profit.
09
Chapter 9
Connecting the Field App
RBCopilot Pro is the office. RBCopilot Field is the crew's phone app. This chapter shows how to send a job out and get reports back.
In this chapter
Dispatch a Field Job · the project key
Field Reports (Mobile) · the “connected” light
9.1 · Dispatch
Dispatch a Field Job
Sidebar → Dispatch Field Job
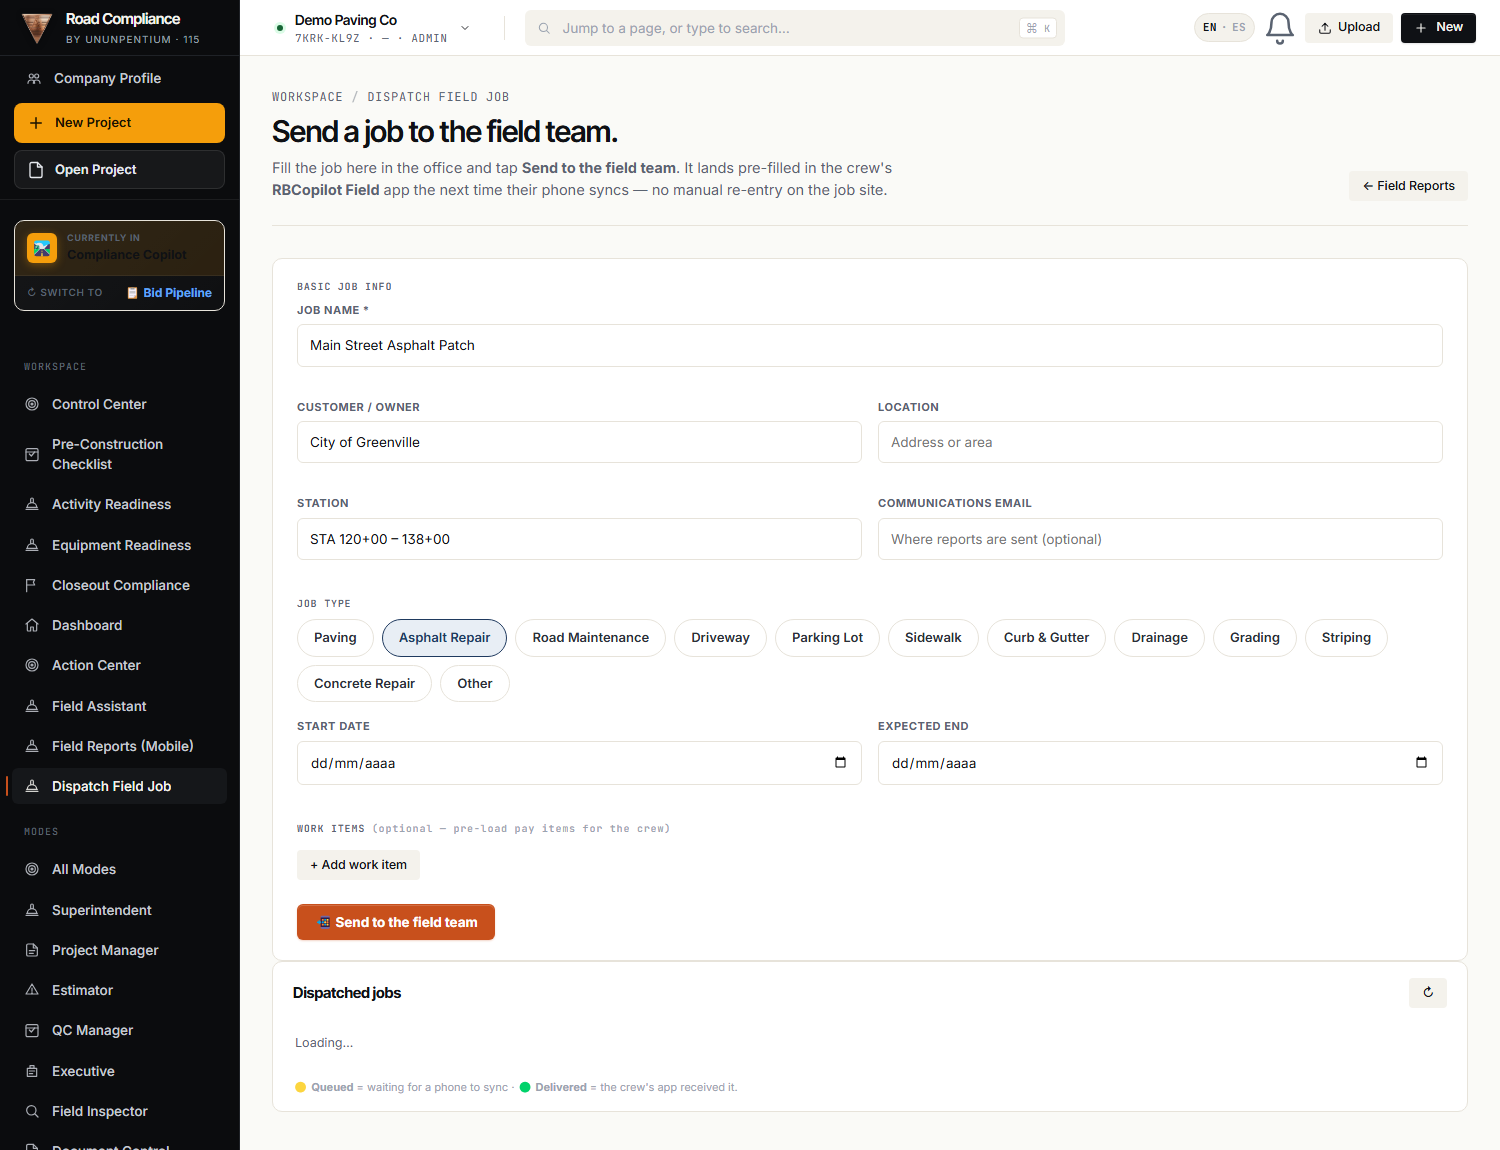
What it is: fill a job here in the office and send it to the crew's phones. Each job gets its own unique Project Key — you give that key to the crew, they paste it into the Field app, and the whole job appears, pre-filled with pay items and plans.
Dispatch Field Job — fill it once; the crew loads it by key.
Open Dispatch Field Job and fill the job (name, customer, location, work items, plan links).
Click Send to the field team. A unique Project Key (rbcp_…) is created.
Copy the key and send it to the crew (email, text, phone — any way).
Watch the status light go from Queued → Delivered when their app receives it.
ℹ️GOOD TO KNOW — One key per project, so nothing gets mixed up. Lost a key? Just rotate it.
9.2 · Field Reports
Field Reports (Mobile)
Sidebar → Field Reports (Mobile)
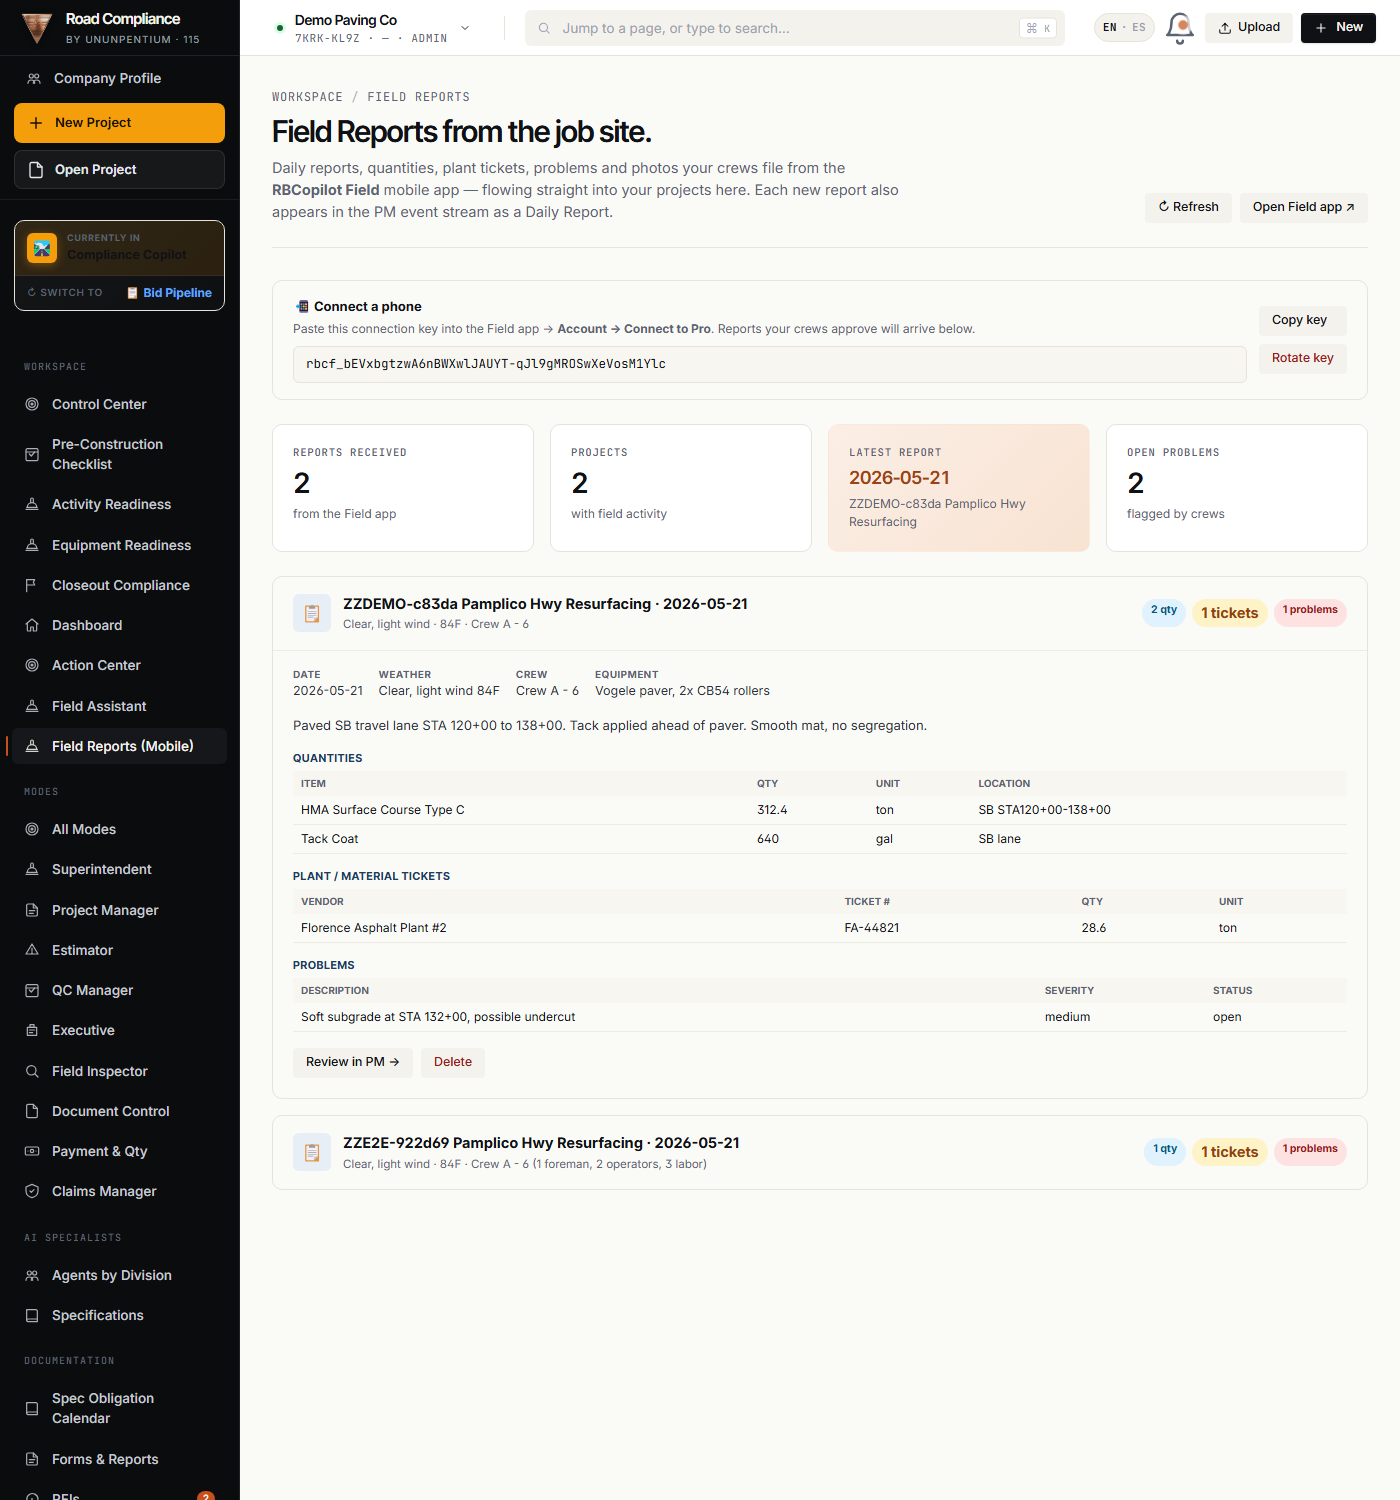
What it is: everything the crew submits flows back here — daily reports, geo-tagged photos (as thumbnails you can enlarge), quantities, tickets and problems. A permanent “RBC Field connected” light tells you a crew device is paired and reporting.
Field Reports — the crew's daily reports and photos, in the office.
The green “RBC Field connected” indicator confirms a crew is paired and syncing.
✅TIP — Field reports feed your Payment, Claims and Evidence modules automatically. The crew's daily tap becomes your money and compliance record — with no re-typing.
You're ready
That's the whole platform.
You now know every screen in RBCopilot Pro — from your first login to winning bids, running compliant projects, recovering money through claims, and connecting your field crews. Keep this manual handy and jump back to any chapter whenever you need a refresher.
Quick daily routine: Dashboard → clear the Action Center → triage events in PM Mode → review incoming Field Reports. Do that every morning and nothing slips.
RBCopilot — The Operating Platform for DOT Contractors
rbcopilot.com · Edition 1.0 · May 2026 · Confidential